
How to maximize additional advertising budget

Demandbase Advertising Expert
-
Journey Stage
All Stages
-
Team
Marketing
-
Expertise Level
Intermediate
Contents
Partner with Demandbase Experts
Get tailored strategies and insights to optimize your approach, drive engagement, and unlock new opportunities.
What you’ll learn
By the end of this playbook, you will know how to:
- Identify the budget-allocation strategy that best supports your objective.
- Calculate projected impressions and average impressions per account per month.
- Confirm that enough advertising inventory exists to support additional spend.
- Calculate the incremental budget required to reach 1,500–2,500 average impressions per account per month.
Why is this important?
Additional budget creates an opportunity, but spending more does not automatically produce better results.
A campaign may be performing well but lack the budget required to reach an effective impression level. Another campaign may have sufficient funding but limited inventory. In other cases, highly engaged or high-intent accounts may represent a better investment than continuing to scale a broader audience.
This playbook helps you evaluate each opportunity consistently so you can direct additional budget toward campaigns and accounts with the strongest combination of:
- Proven performance.
- Available inventory.
- Meaningful account engagement.
- Active buying signals.
- Alignment with your campaign objectives.
What you need to get started
Demandbase access
You need access to:
- Advertising > Campaigns
- Advertising > Inventory Planner
- Account Database > Account Lists
- The account lists and keyword sets used by your campaigns
You also need permission to create or edit dynamic account lists and edit, publish, or republish advertising campaigns.
Campaign inputs
Gather the following information for each campaign you are considering:
- Current total campaign budget.
- Spend delivered to date.
- Remaining budget.
- Average CPM.
- Campaign start and end dates.
- Target account list and current account count.
- Geotargeting.
- Ad type and ad sizes.
- Current pacing.
- Engagement, conversion, and overall performance.
Audience inputs
Depending on the strategy, you may also need:
- A definition of what qualifies as a high-value website page.
- A minimum advertising-click threshold.
- A page-view or website-activity threshold.
- A recent-activity window.
- The Demandbase Intent keyword set used by the current campaign.
- The intent strengths you want to include.
- A parent target account list, when the audience must remain within a defined market.
Campaign assets
For a new campaign, have the appropriate creative sets and landing page ready before you begin.
How to use this playbook
Start with the strategy that best matches your objective. Complete its steps in order, then use the Pro Tip and Success Check to validate your decision and monitor performance.
1. Increase Budget for Underfunded Live Campaigns
Use this strategy when a successful in-market campaign is projected to deliver fewer than the recommended number of impressions per account.
Recommended when: Scaling successful campaigns already in market.
2. Retarget Highly Engaged Accounts
Use this strategy to reconnect with accounts that have already demonstrated strong interest through advertising activity, website engagement, or both.
Recommended when: Converting existing engagement into deeper account progression.
3. Reach New High-Intent Accounts
Use this strategy to reach accounts actively researching topics related to your solution by launching a new campaign or expanding an existing one.
Recommended when: Capturing new in-market demand.
4. Extend High-Performing Campaigns
Use this strategy when a campaign is delivering strong results and you want to extend its flight while maintaining consistent engagement.
Recommended when: Sustaining momentum and maximizing campaign impact.
Standard Demandbase campaign launch workflow
When a strategy calls for a new campaign, complete Campaign Builder in this order:
- Campaign Basics: Set the campaign name, flight dates, account list, ad format, geotargeting, and other audience settings.
- Journey Targeting: Configure Journey Targeting when it is part of your strategy, or skip this optional step.
- Add Ad Groups: Assign the creative sets you want to deliver.
- Media Planning: Enter the campaign budget, select the ad plan, and run Check Budget.
- Review and Publish: Review the complete campaign configuration, resolve any warnings, and publish.
Part 1: Increase budget for underfunded live campaigns
When to use this strategy
Choose this option when a campaign is performing so-so, projected delivery is below 1,500 average impressions per account per month, and sufficient inventory remains.
Goal
Bring projected delivery into the recommended range of 1,500–2,500 average impressions per account per month without exceeding available inventory, and take it to the next level.
Step 1: Calculate your current average impressions per account per month
Use the campaign’s remaining budget, current average CPM, current target account count, and remaining campaign days to establish a forward-looking monthly delivery baseline.
This calculation estimates what the campaign can still deliver. It is not a calculation of historical impressions already served.
1. Calculate the remaining budget
Remaining Budget = Current Total Campaign Budget − Spend Delivered to Date
Use only the dollars available for the rest of the campaign.
2. Record the average CPM
Use the campaign’s current average CPM rather than a general planning estimate.
CPM represents the cost of delivering 1,000 impressions.
3. Record the current target account count
Use the number of accounts currently in the campaign’s target account list.
If the campaign uses a dynamic list, use the account count shown when you perform the calculation.
4. Calculate the remaining campaign duration
Count the number of calendar days remaining in the campaign, using today as the start date and the campaign end date as the end of the period.
Formula 1: Remaining Campaign Months = Number of Days Remaining ÷ 30.416
5. Calculate average impressions per account
Formula 2: Total Projected Impressions = (Remaining Budget ÷ Average CPM) × 1,000
6. Calculate average impressions per account per month
Formula 3: Average Impressions per Account per Month = Total Projected Impressions ÷ Number of Target Accounts ÷ Remaining Campaign Months
7. Interpret the result
- Below 1,500 impressions per account per month: Consider increasing the budget if the campaign is performing so-so.
- Between 1,500 and 2,500 impressions per account per month: The campaign is within the recommended range.
- Above 2,500 impressions per account per month: Additional budget may not be necessary solely to increase impression volume.
Step 2: Review the campaign’s Maximum Available Spend
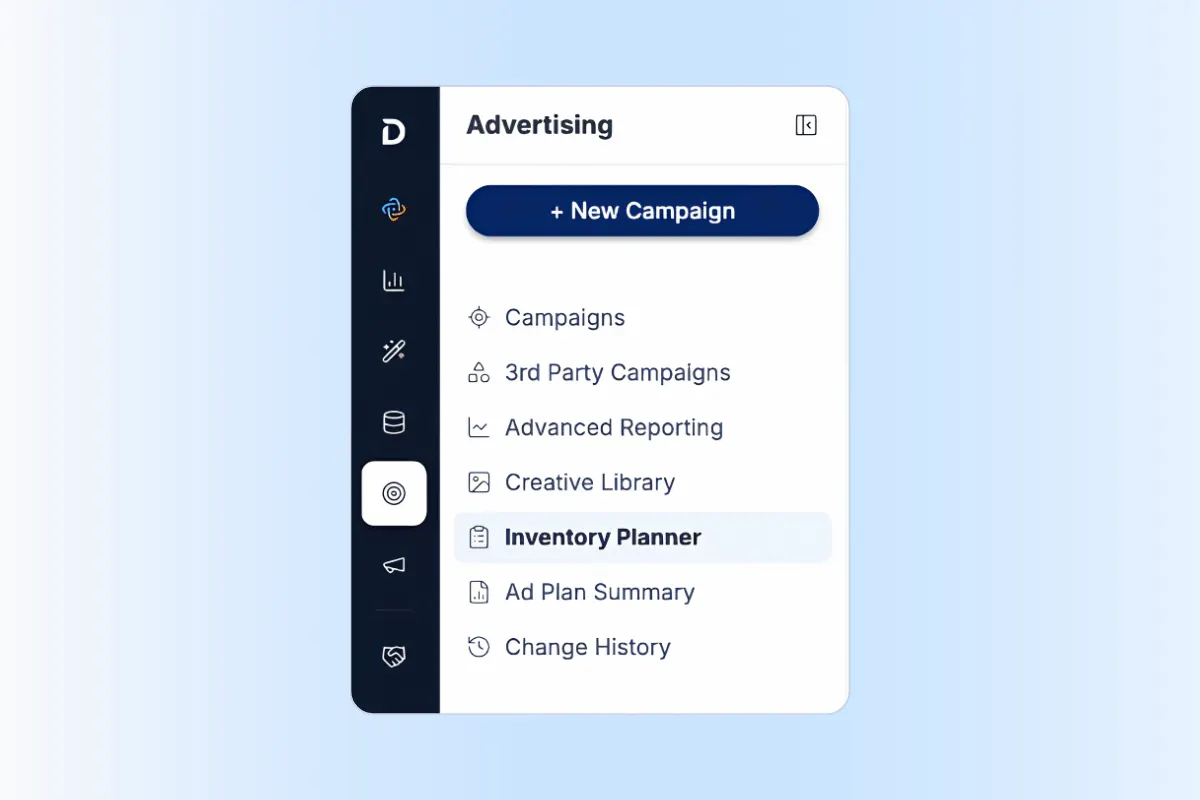
Navigate to:
Advertising > Inventory Planner
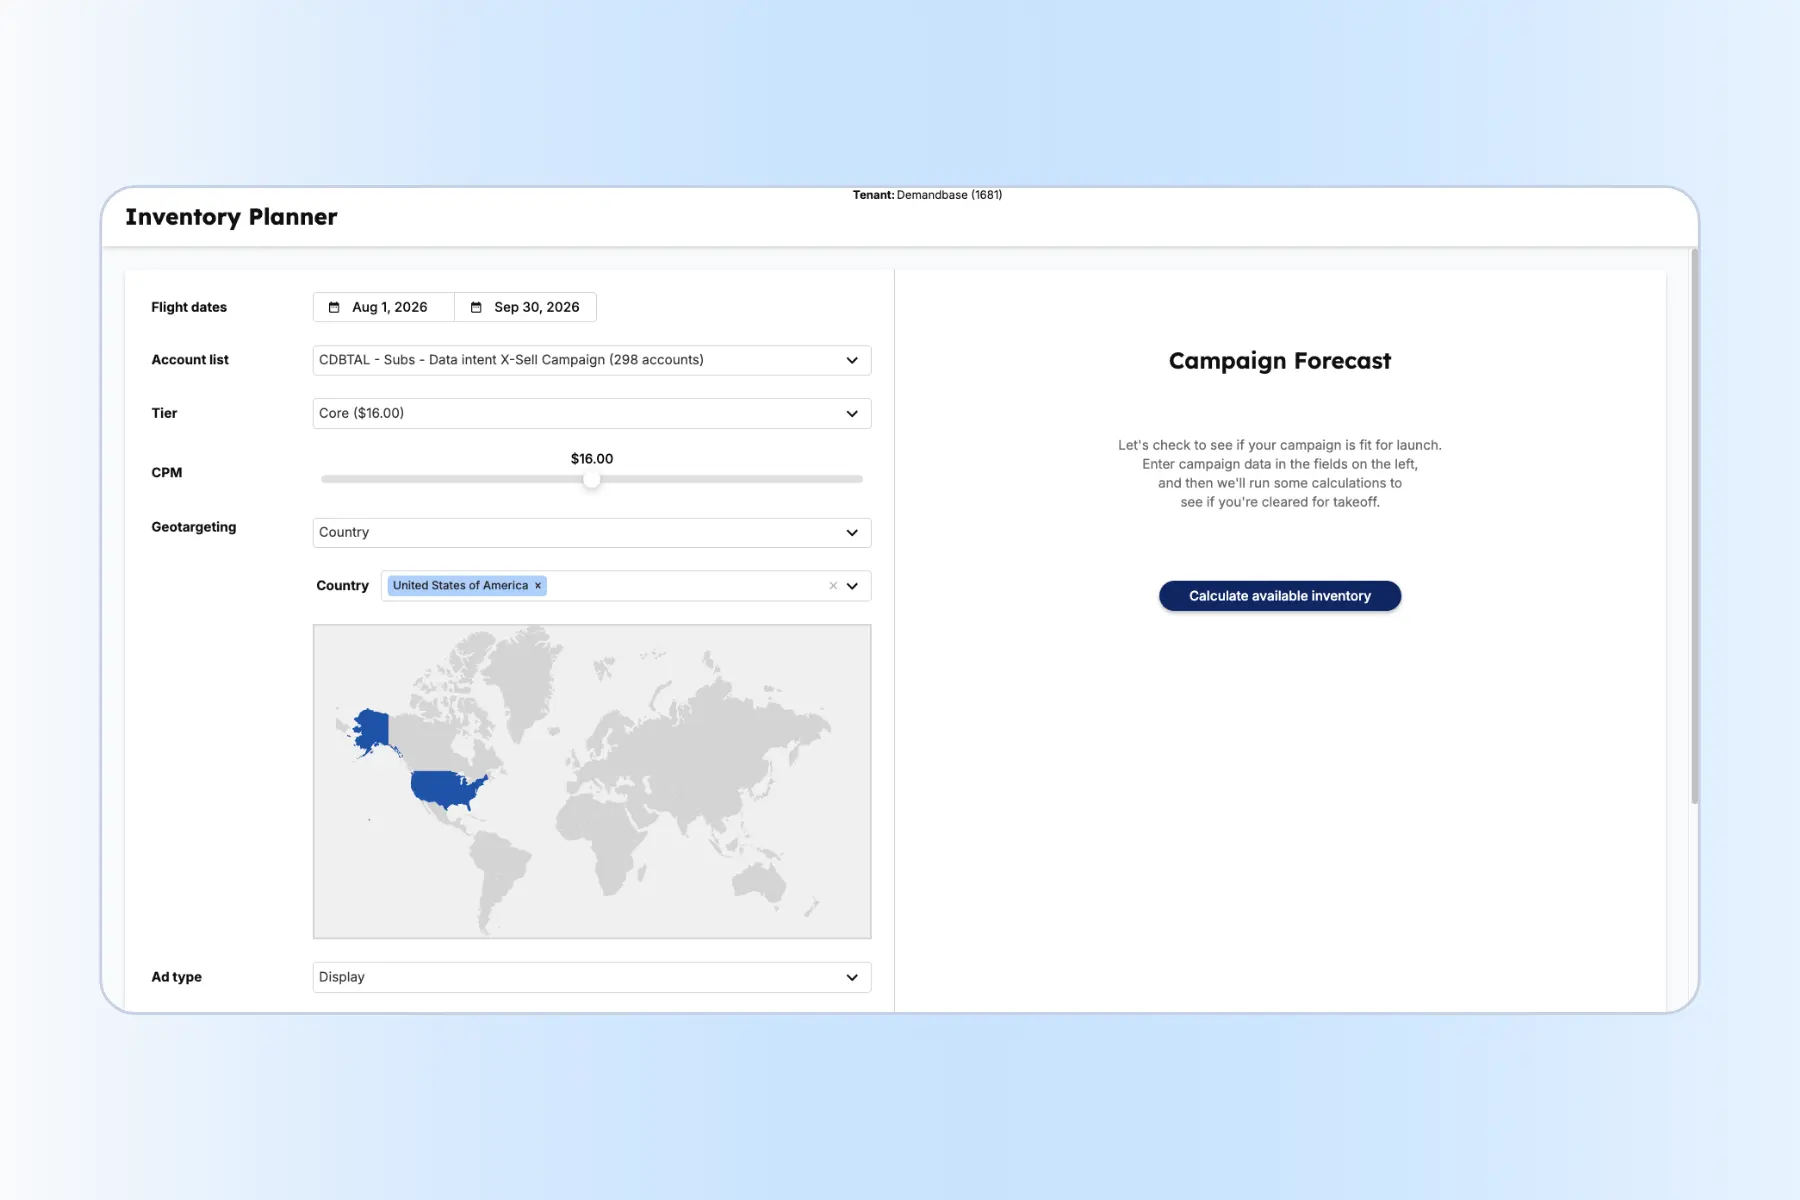
Configure the forecast to match the campaign:
- Set the Flight dates for the period in which the remaining and additional budget will run.
- Select the campaign’s current Account list.
- Select the appropriate Tier.
- Adjust the CPM to match the campaign’s current average CPM.
- Match the campaign’s Geotargeting.
- Select the same Ad type.
- Select the same Ad sizes.
- Click Calculate available inventory.
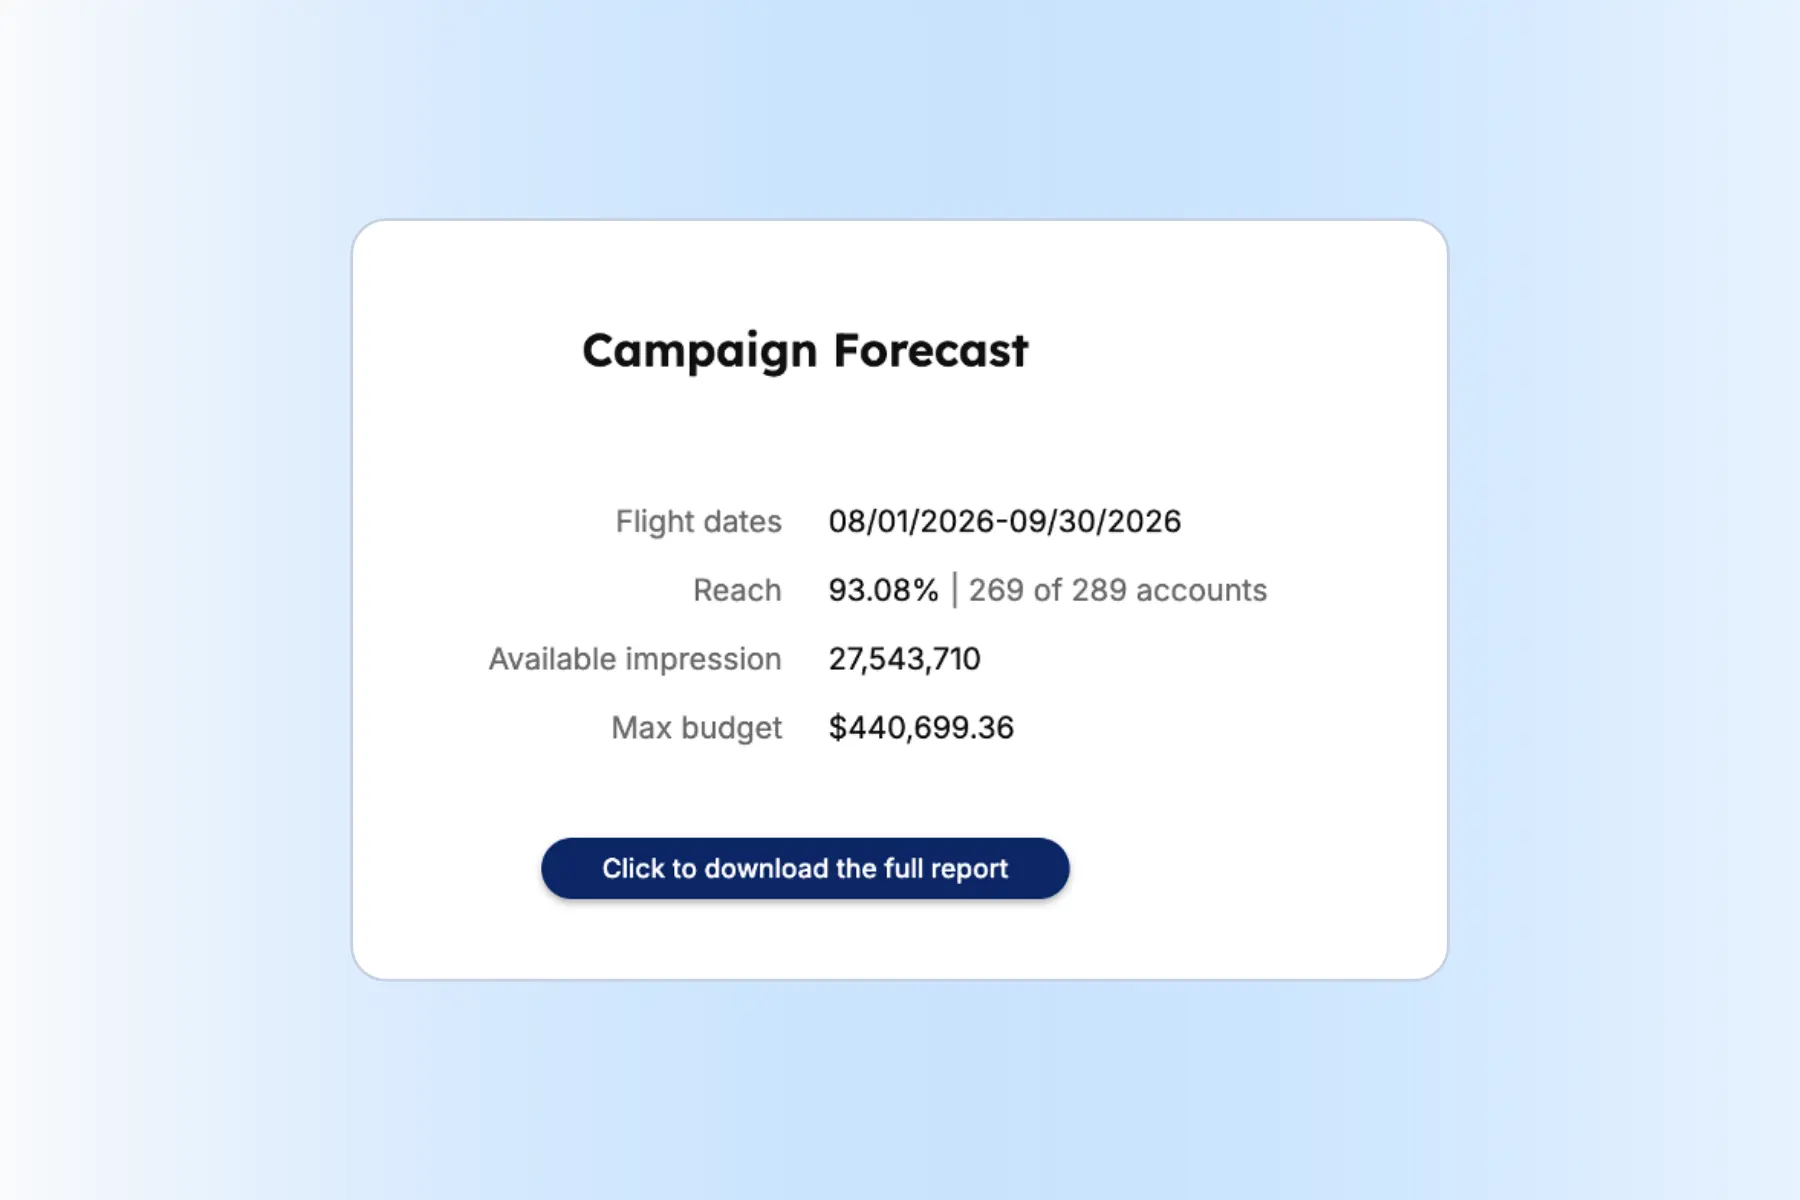
Review the resulting:
- Reach.
- Reachable account count.
- Available impressions.
- Maximum budget, referred to in this playbook as Maximum Available Spend.
The Demandbase Help Center also provides detailed Inventory Planner instructions.
Before you continue: If limited inventory remains, consider another strategy.
Maximum Available Spend is a ceiling—not a recommendation to spend the full amount.
Calculation example
Campaign Details:
- Remaining Budget: $6,000
- Average CPM: $16.00
- Target Accounts: 300
- Remaining Campaign Days: 61
- Remaining Campaign Months: 61 ÷ 30.416 = 2.006
- Maximum Available Spend: $18,500
Projected Impressions = ($6,000 ÷ $16) × 1,000 = 375,000
Average Impressions/Account/Month = 375,000 ÷ 300 ÷ 2.006 = 623
Incremental Budget Progression Example:
With 61 days remaining, a remaining budget of about $14,440 reaches the minimum target of 1,500 impressions per account per month. The $18,500 Maximum Available Spend supports about 1,922 impressions per account per month. Reaching the upper target of 2,500 would require about $24,066, which exceeds the available inventory.
Step 3: Calculate the additional budget needed
Choose a target between 1,500 and 2,500 average impressions per account per month based on campaign performance and the amount of additional budget available.
Target Projected Impressions = Target Impressions per Account per Month × Number of Target Accounts × Remaining Campaign Months
Required Remaining Budget = (Target Projected Impressions ÷ 1,000) × Average CPM
Additional Budget Needed = Required Remaining Budget − Current Remaining Budget
If the result is zero or negative, no additional budget is required to reach that target.
New Total Campaign Budget = Current Total Campaign Budget + Additional Budget Needed
Using the example:
- Reaching 1,500 impressions per account per month requires a remaining budget of about $14,440, or about $8,440 in additional budget.
- Reaching 2,500 impressions per account per month requires a remaining budget of about $24,066, or about $18,066 in additional budget.
The minimum target remains below the $18,500 Maximum Available Spend, while the upper target exceeds it.
Step 4: Add budget, review changes, and publish the campaign
Navigate to:
Advertising > Campaigns > Select your campaign > Edit Campaign > Step 4: Media Planning > Step 5: Review & Publish
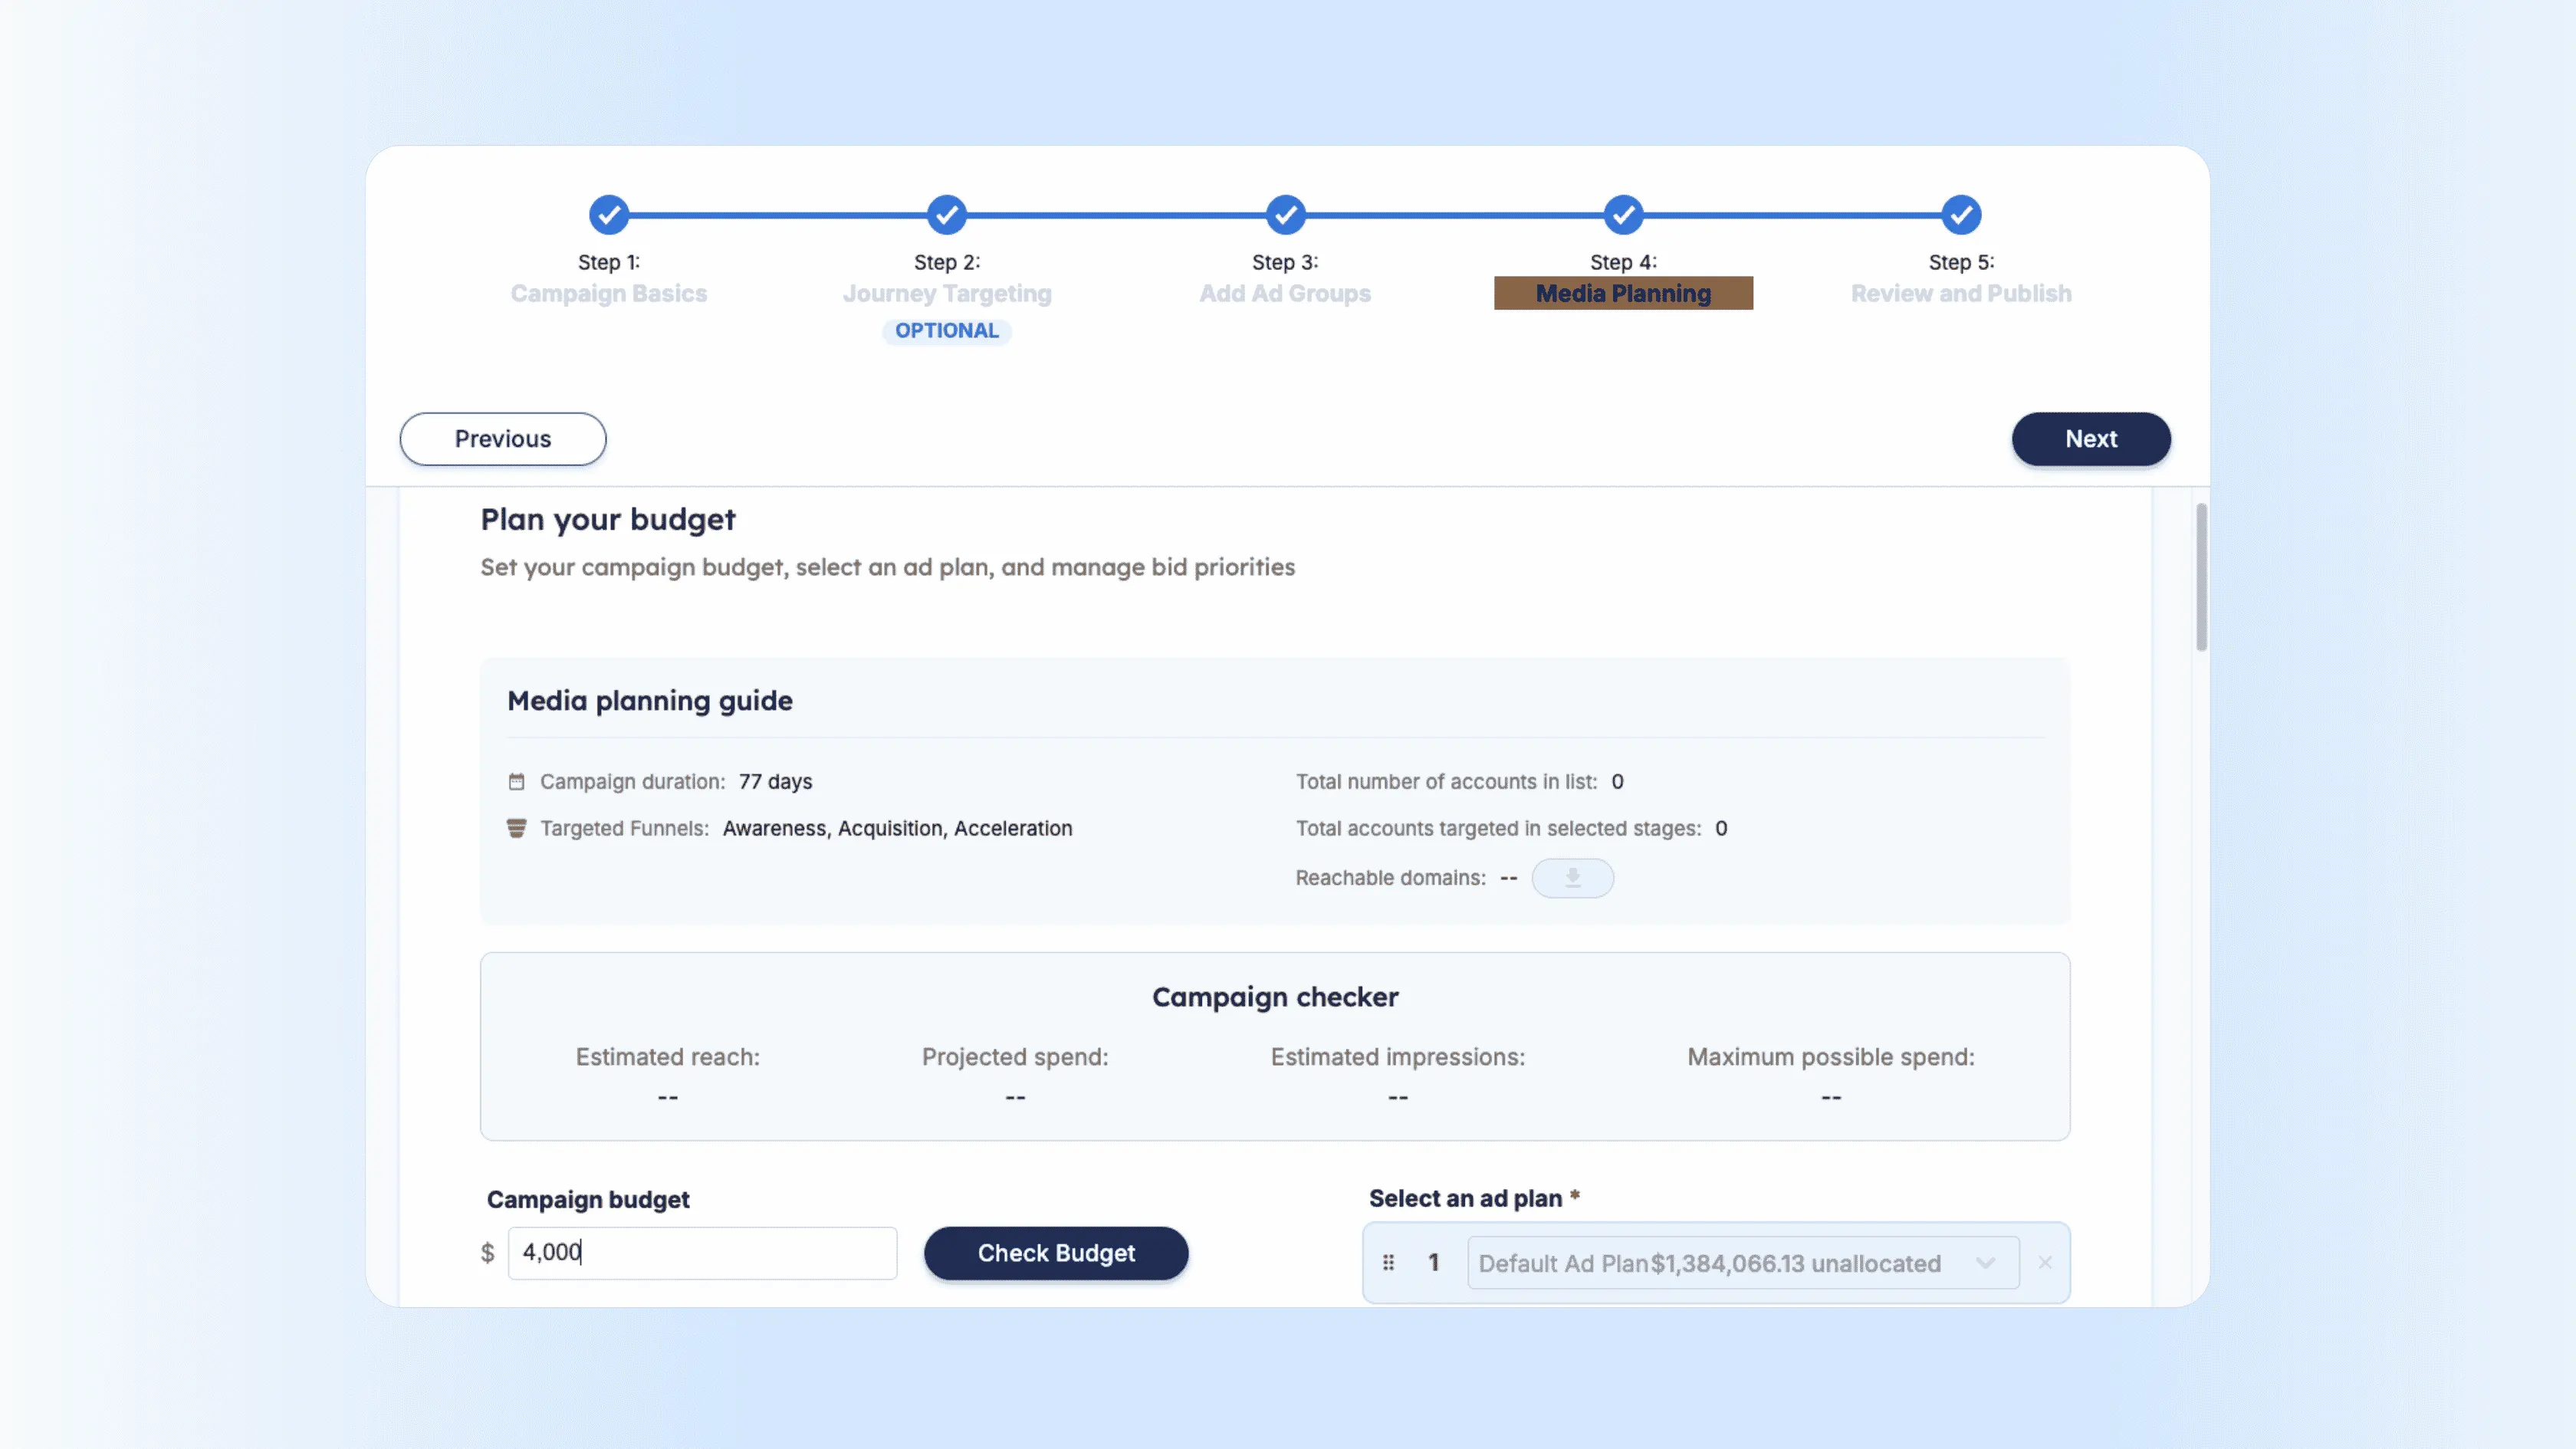
1. Enter the new total campaign budget
In Step 4: Media Planning, enter:
Current Total Campaign Budget + Additional Budget Needed
Do not enter only the incremental amount.
2. Run the Campaign Checker
Click Check Budget.
Before continuing, verify that:
- The revised budget is below Maximum possible spend.
- The selected ad plan has enough unallocated budget.
- Estimated impressions align with your target.
- Estimated reach remains acceptable.
- The account count has not changed materially since you completed the calculation.
3. Review and publish
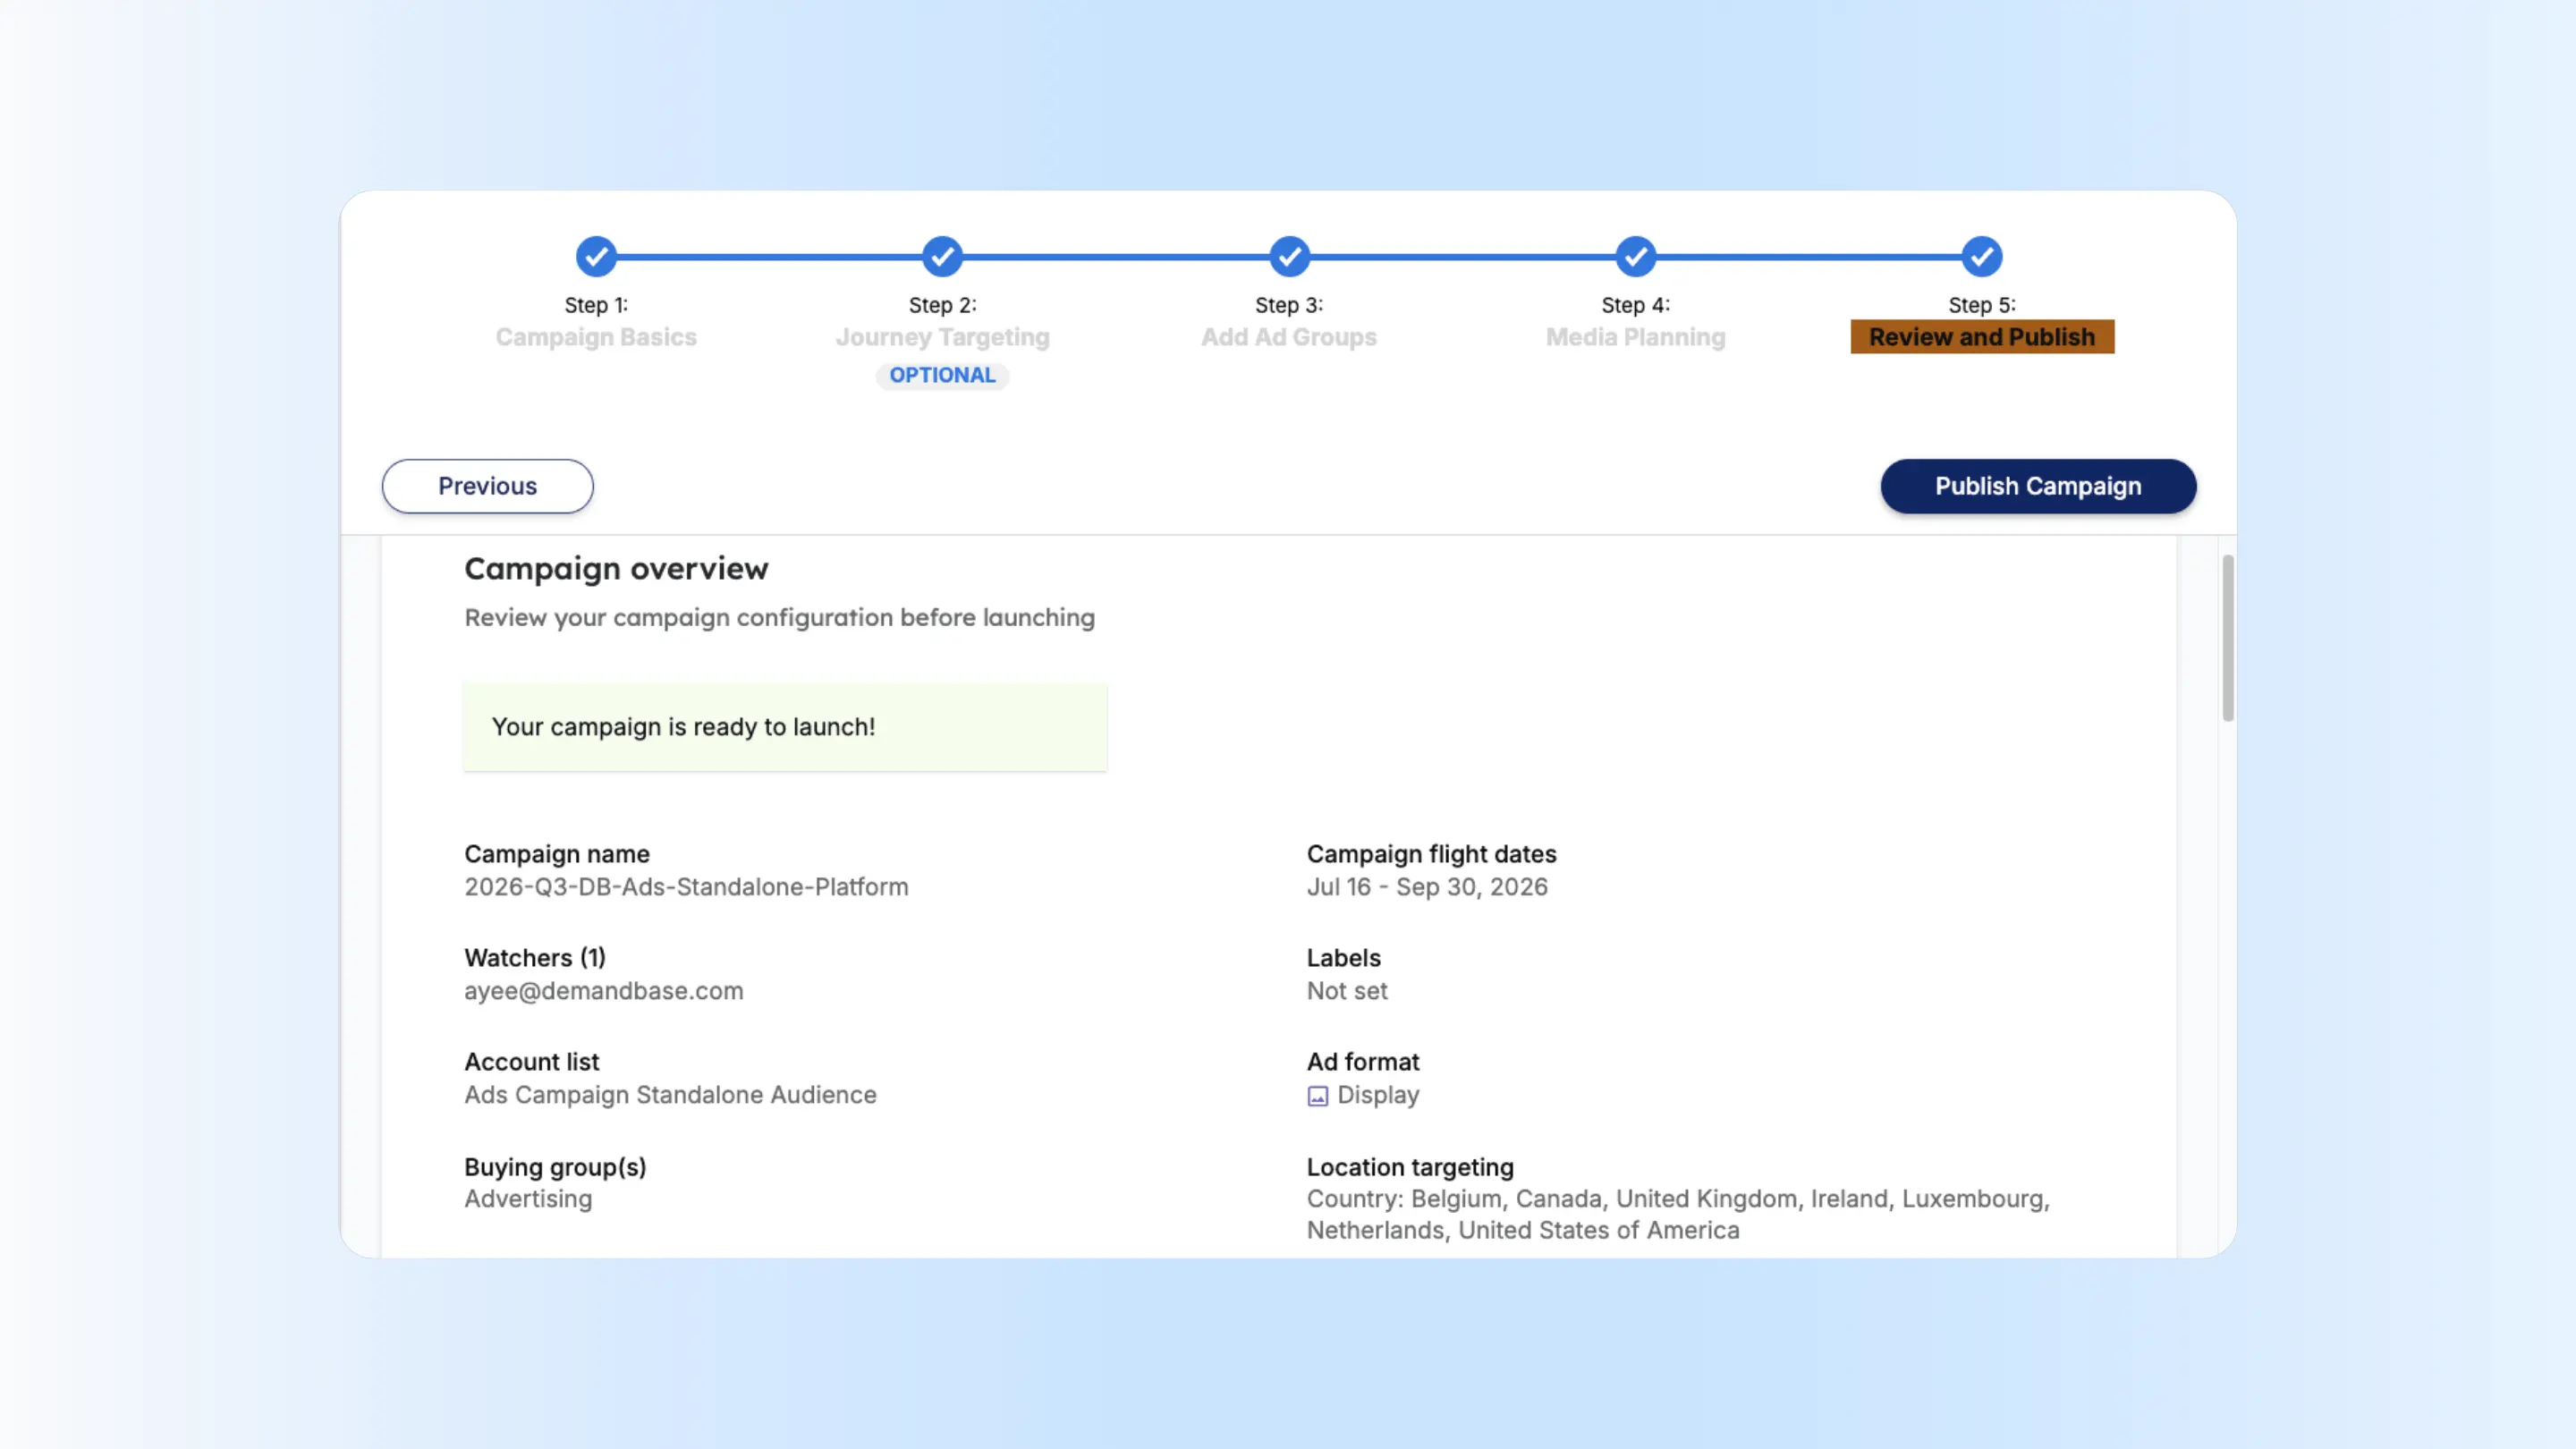
Go to Step 5: Review and Publish.
Verify the:
- Campaign name.
- Flight dates.
- Account list.
- Targeting.
- Creative and ad groups.
- Total budget.
- Ad plan.
- Journey Targeting settings, when used.
Resolve any Campaign Builder warnings, then click Publish Campaign.
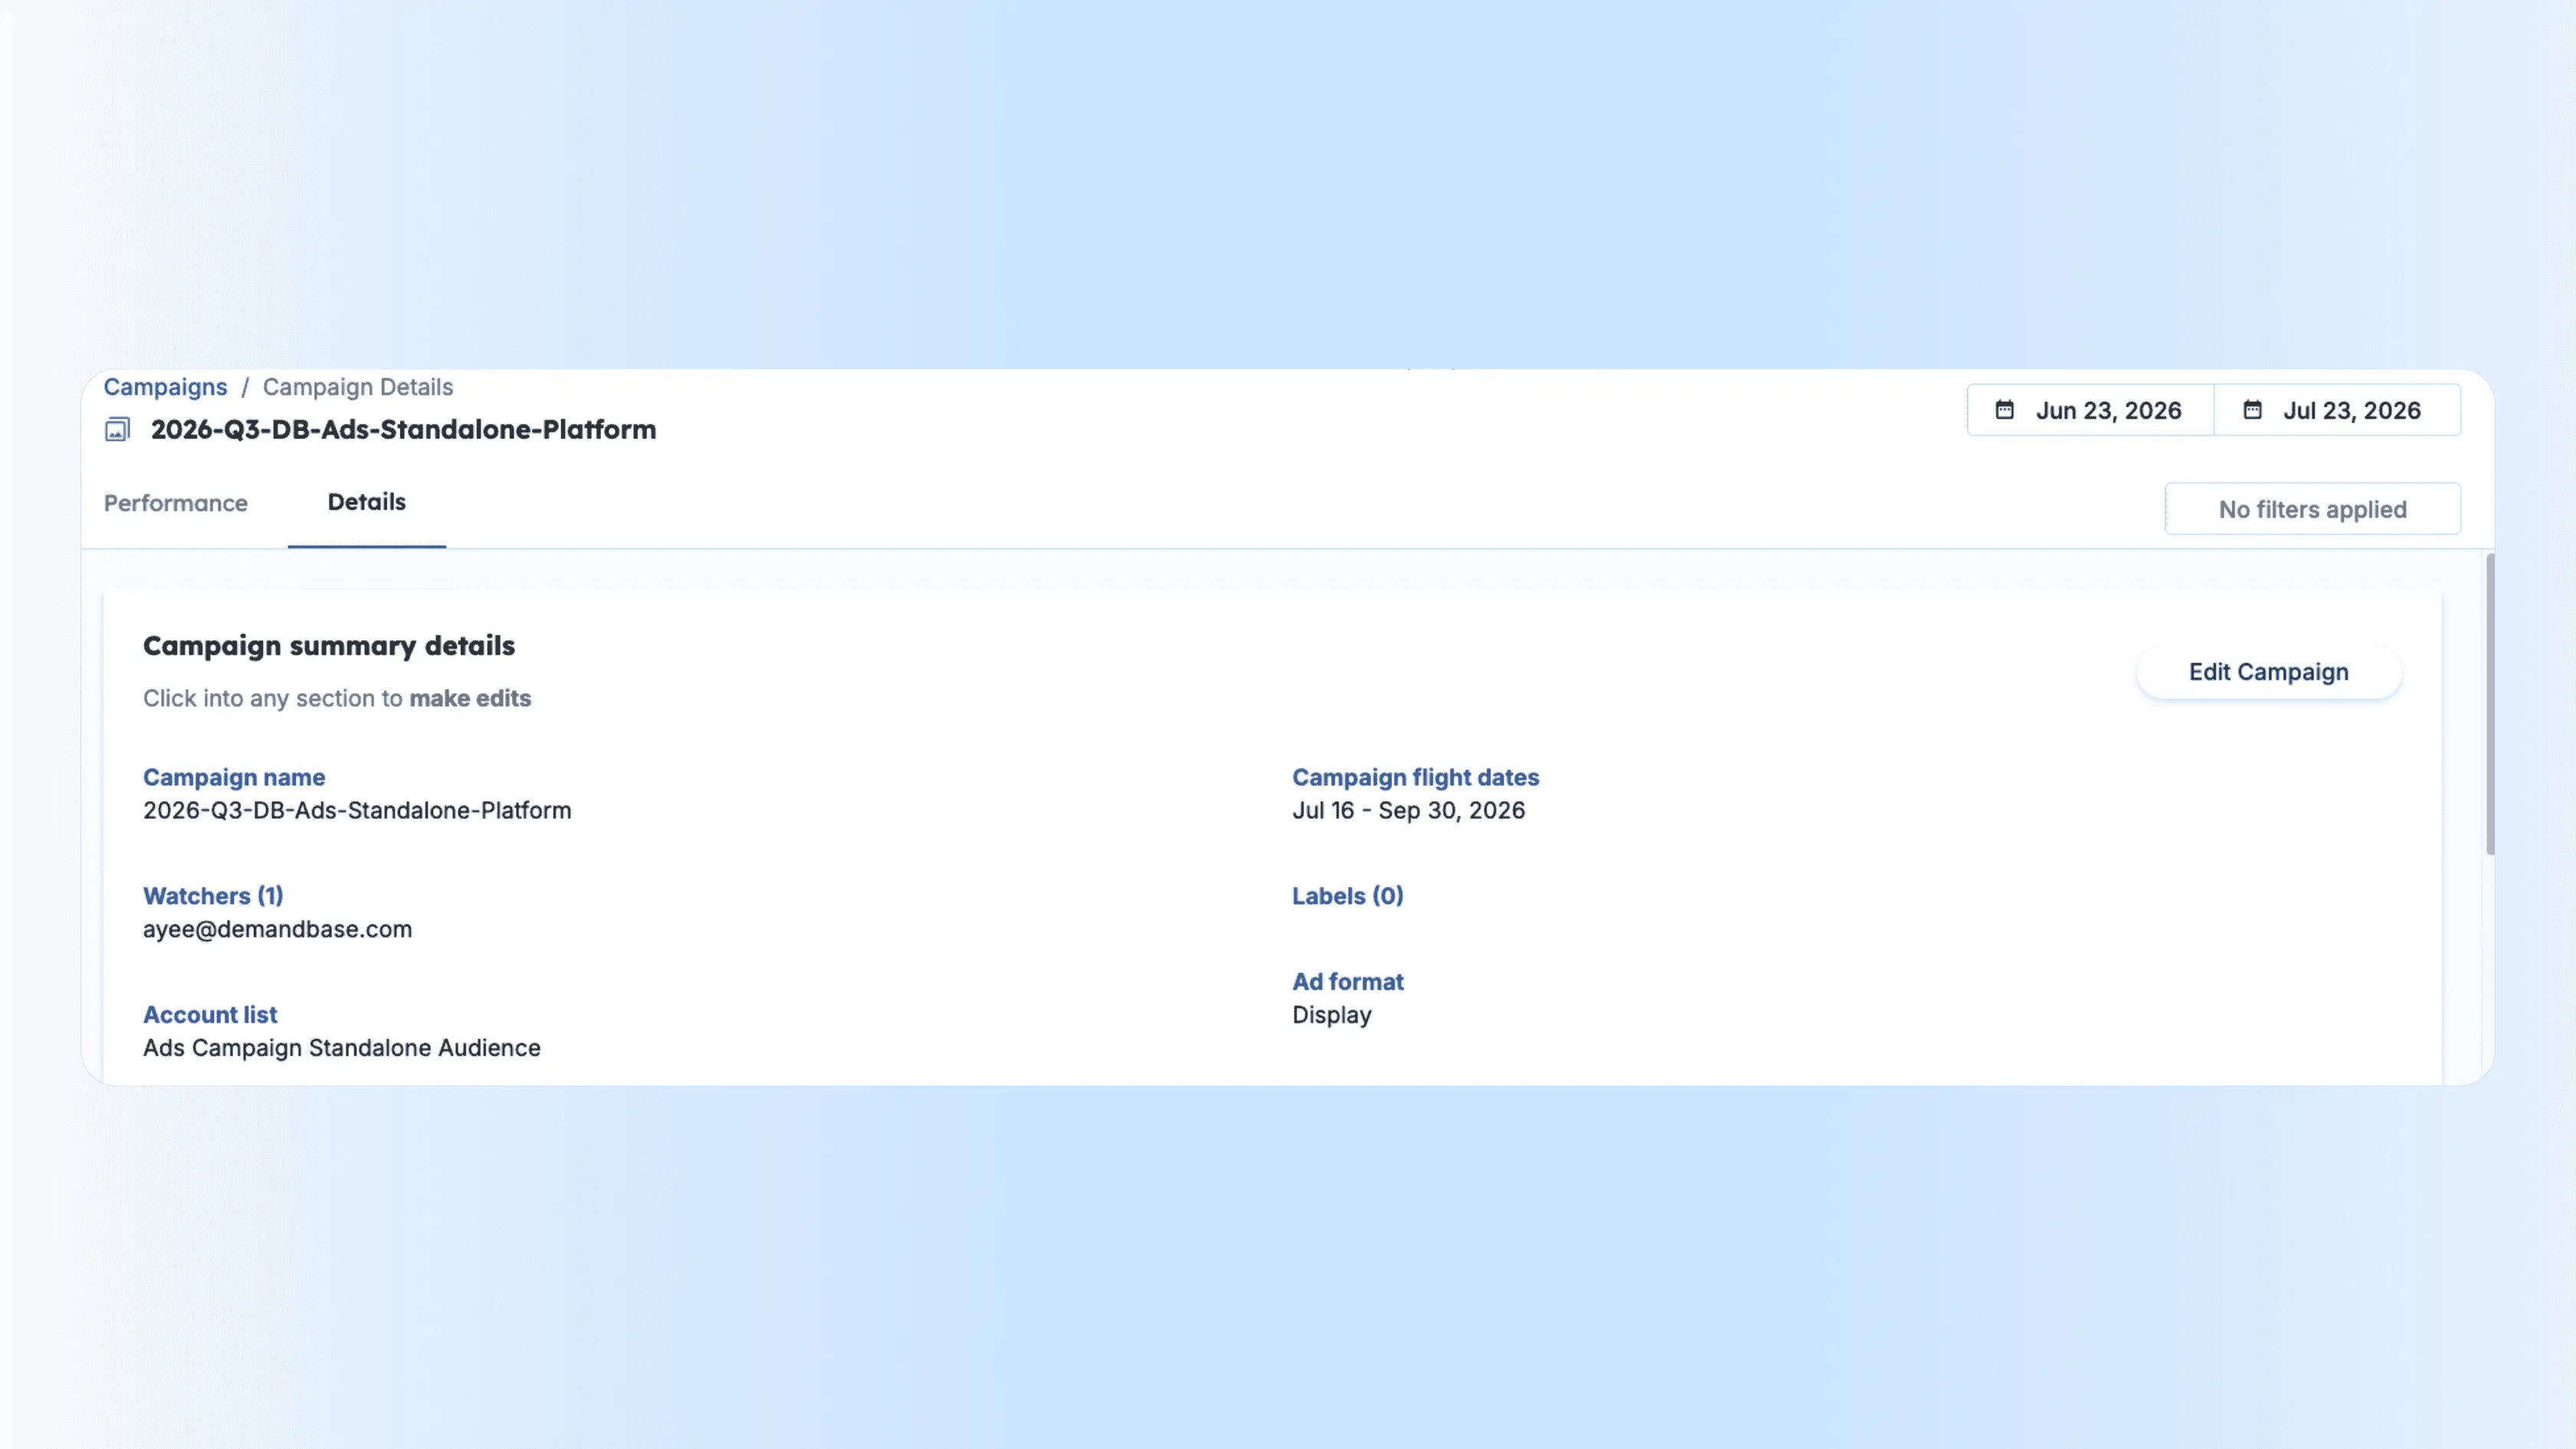
4. Confirm the update
Return to the campaign Details page and verify that the revised total budget appears in the campaign summary.
Pro Tip: Only increase budget on campaigns that are already performing so-so and still have sufficient available inventory.
Success Check: Monitor engagement, conversions, pacing, and overall campaign performance over the next 7–14 days.
Part 2: Retarget highly engaged accounts
When to use this strategy
Choose this option when accounts are actively engaging with your advertising, your website, or both, and you want to encourage continued progression through the buying journey.
Goal
Focus additional investment on accounts already demonstrating buying intent.
Step 1: Build a dynamic account list
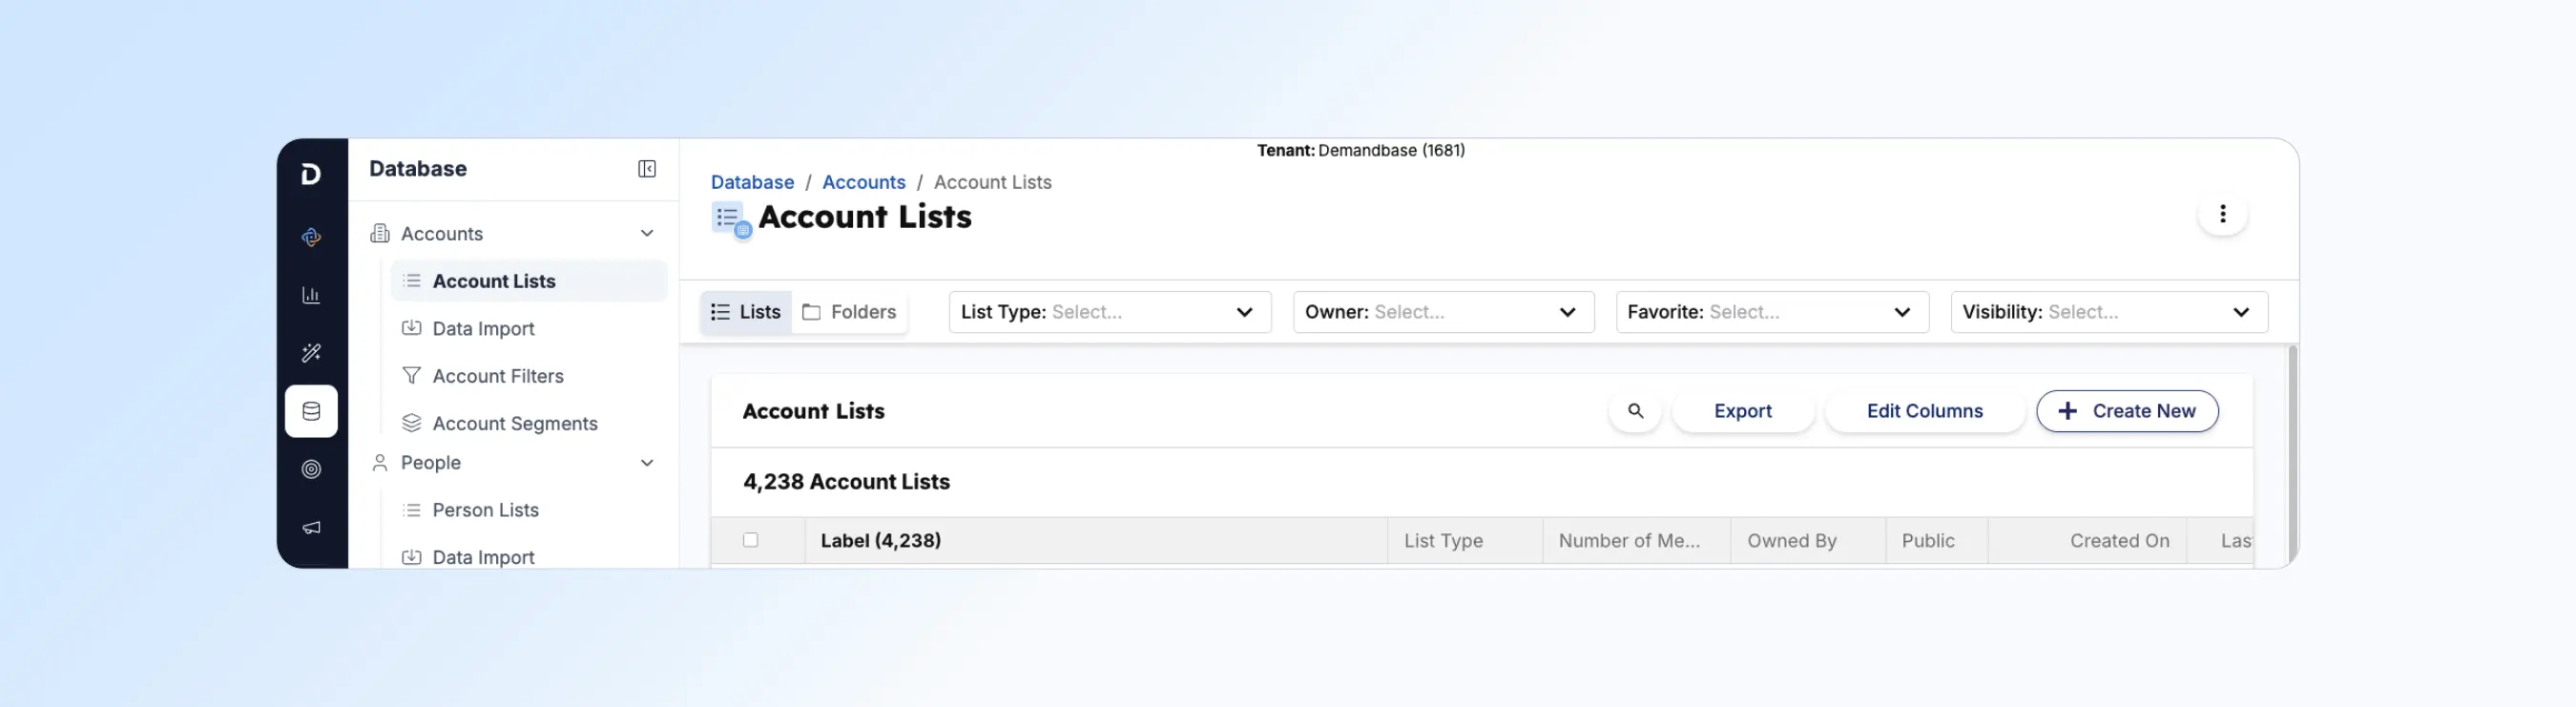
Navigate to:
Account Database > Account Lists > Create New Account List
This area appears under Database > Accounts > Account Lists.
Create a dynamic audience using:
- Advertising clicks.
- Visits to high-value pages.
- Page-view thresholds.
- Recent activity.
- Other signals that meet your definition of high engagement.
Example audience
On-site engagement with high-value pages AND >= 4 clicks on an advertising campaign
Because the advertising-click condition must be combined with website engagement using AND logic, create two dynamic lists.
A. Create the advertising-click helper list
Name the list something clear, such as:
Accounts That Have Clicked in [Campaign Name]
Configure the selector:
- Add Accounts with Any Activity.
- Select Advertising Click.
- Set Number of Clicks to >= 4.
- Set Campaign Name to the applicable advertising campaign.
- Refresh the account count.
- Save the list.
B. Create the final Highly Engaged Accounts list
Create a second dynamic list named something like:
Highly Engaged Accounts – [Campaign Name]
Configure the selector in this order:
- When the audience must stay within an existing target market, add:
- Member of List = [Parent Target Account List]
- Add:
- Accounts with Any Activity > Visited Web Page
- Define the high-value page:
- For example, Web Page Contains demandbase.com/resources
- Replace the example with your own product, solution, pricing, demo, resource, or other high-value page.
- Set the activity window:
- The source example uses Event Activity Date in the past 3 months.
- Add any required page-view threshold.
- Add:
- Member of List = Accounts That Have Clicked in [Campaign Name]
- Connect the website-engagement condition and helper-list membership with AND.
- Refresh the account count.
- Spot-check several qualifying accounts.
- Save the list.
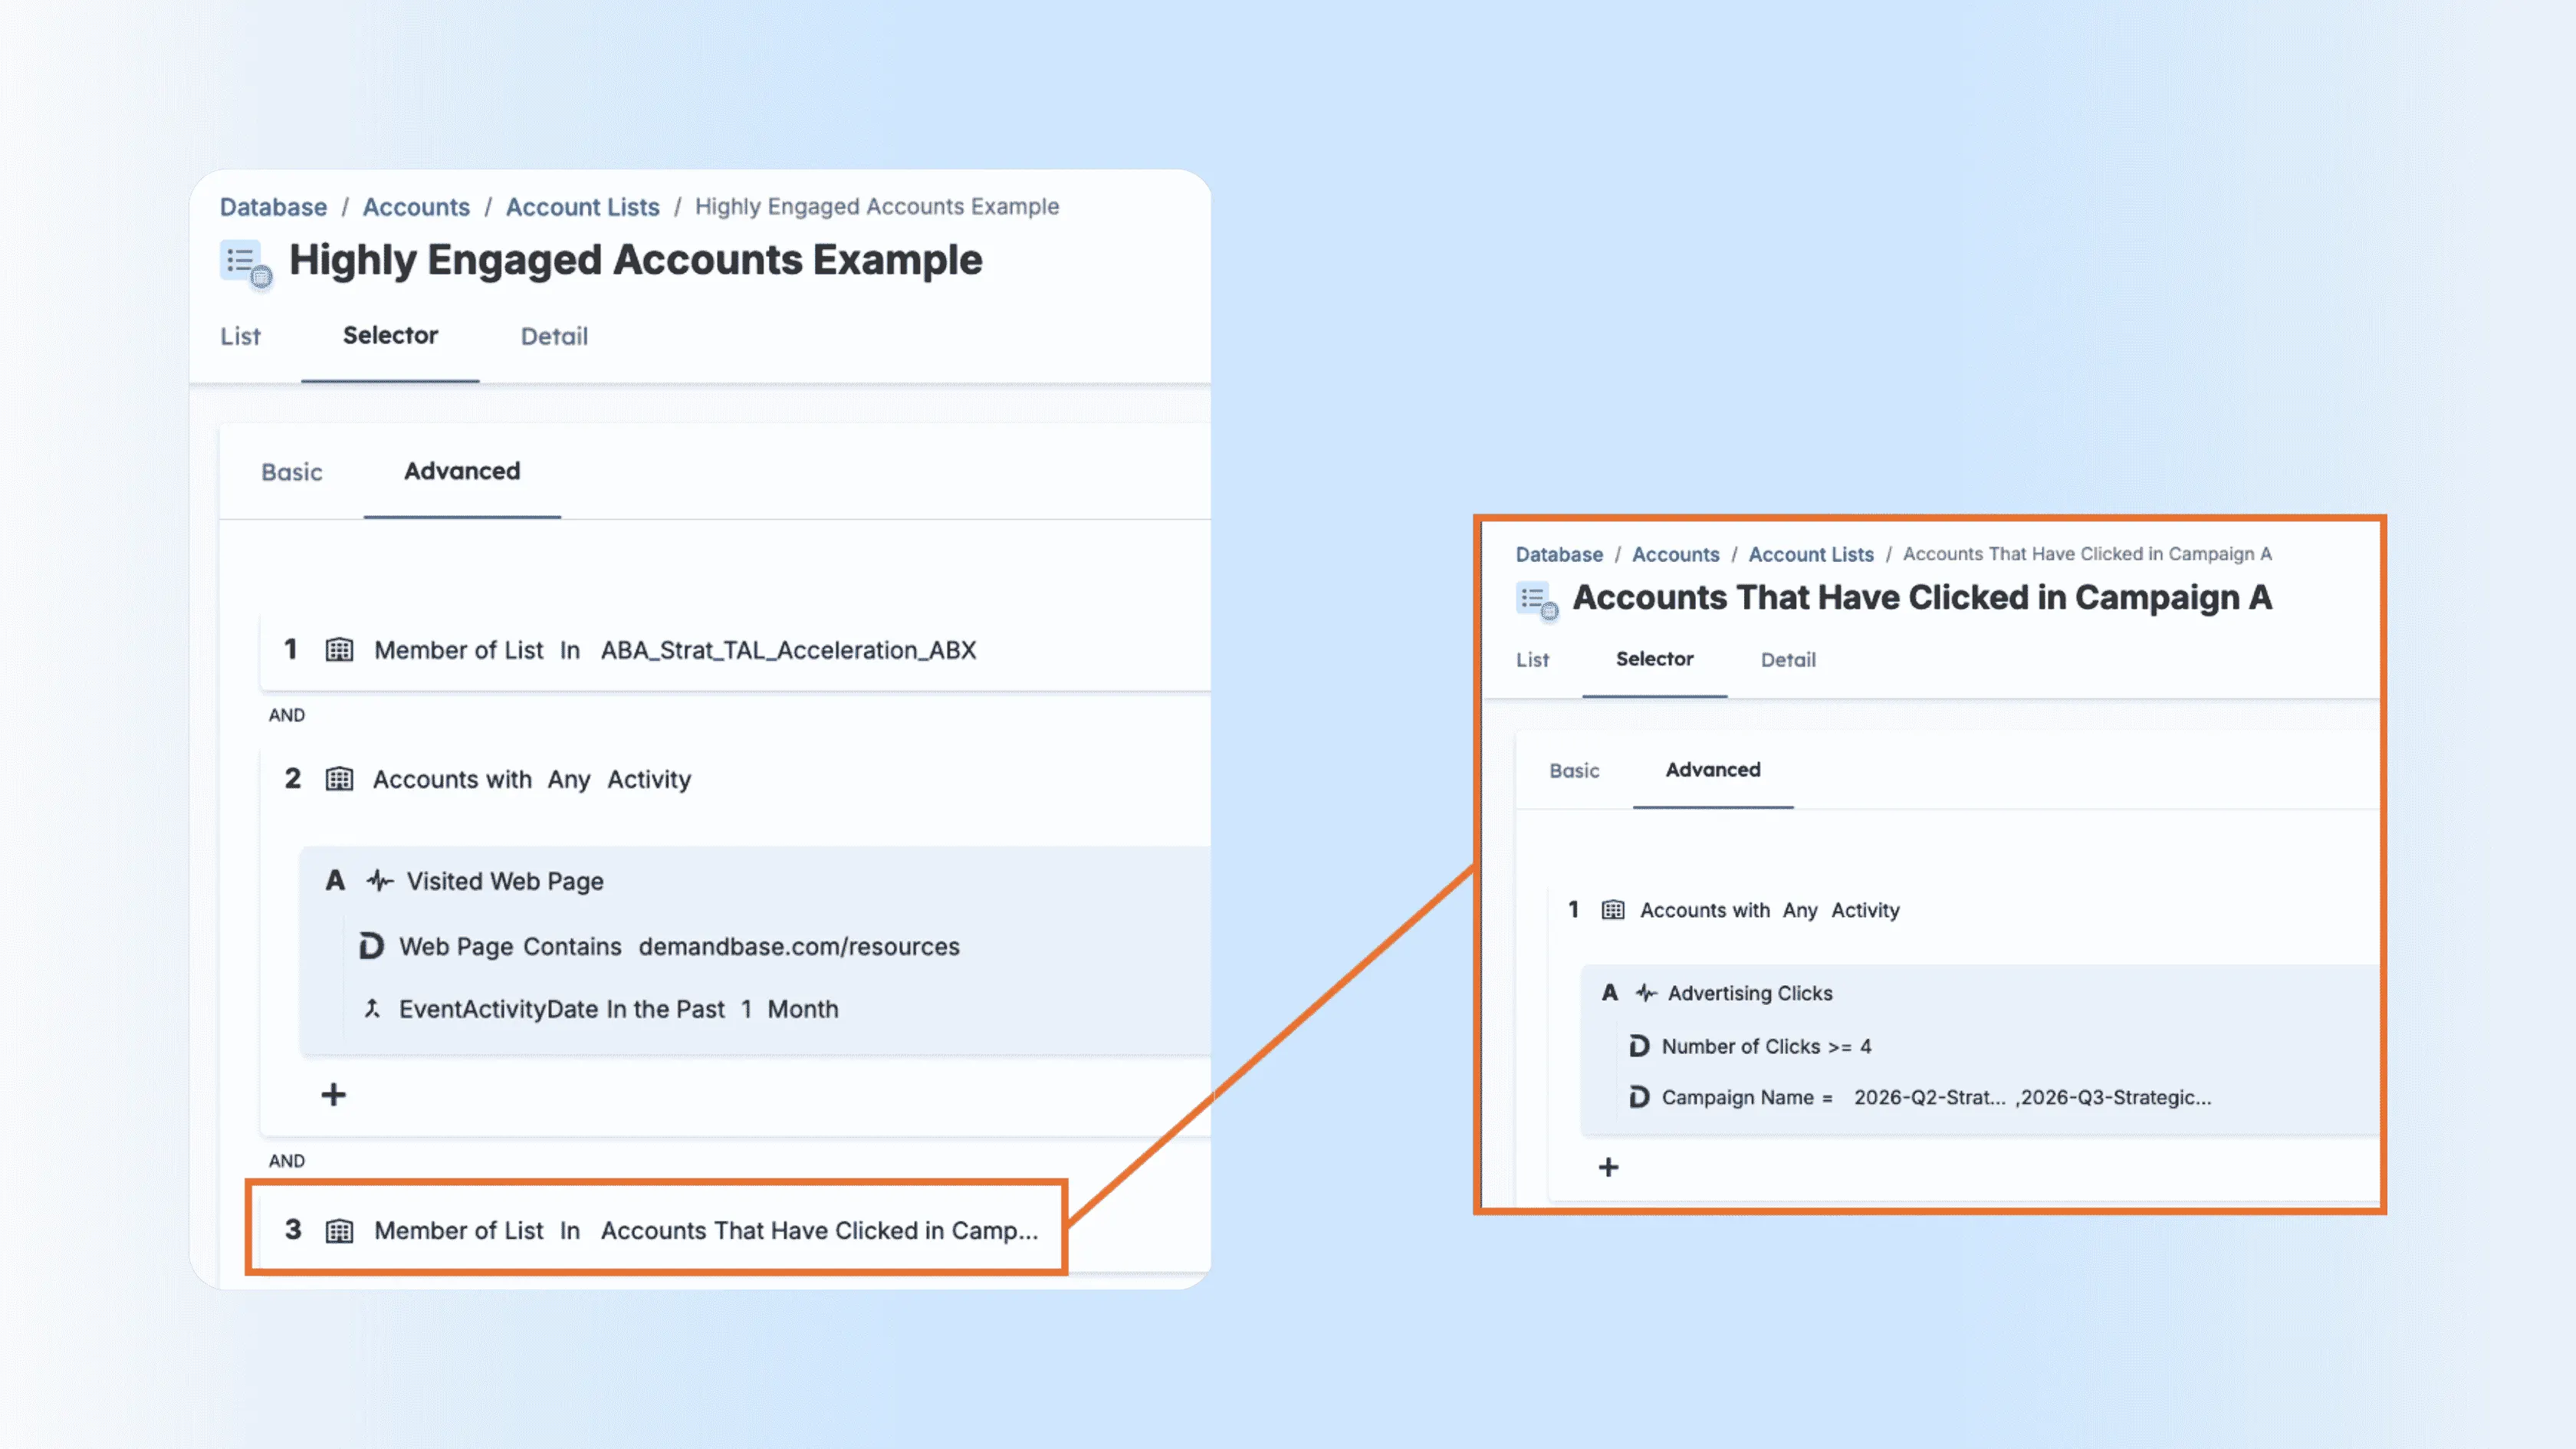
The resulting logic is:
High-value on-site engagement AND Member of the advertising-click helper list
You can add other engagement signals, but avoid making the audience so broad that weakly engaged accounts qualify.
Step 2: Build and launch the retargeting campaign
Launch a Demandbase campaign using the newly created Highly Engaged Accounts list.
Follow the standard Campaign Builder workflow defined at the beginning of this playbook.
Use the following inputs:
- Target account list: Highly Engaged Accounts.
- Creative: Messaging appropriate for accounts that already know your brand or solution.
- Flight dates: The period during which you want to deepen engagement.
- Budget: Enough to deliver 1,500–2,500 average impressions per account per month across the campaign duration.
Use the formulas from Part 1 with the current size of the Highly Engaged Accounts list.
In Media Planning:
- Enter the calculated campaign budget.
- Select the appropriate ad plan.
- Click Check Budget.
- Confirm that the estimated impressions, reach, and projected spend support the campaign.
- Confirm that the budget remains below Maximum Possible Spend.
- Review and publish the campaign.
Pro Tip: Smaller, highly engaged audiences often outperform broader retargeting audiences.
Success Check: Monitor account engagement and buying journey progression.
Part 3: Reach new high-intent accounts
When to use this strategy
Choose this option when accounts are actively researching topics related to your solution and are also engaging with your website.
Goal
Reach new high-intent accounts.
You can execute this strategy in two ways:
- Option A: Create a new high-intent audience and launch a separate campaign.
- Option B: Expand the account list used by an existing campaign.
Option A: Launch a new high-intent campaign
Step 1: Build a dynamic account list for intent accounts not in the current campaign
Navigate to:
Account Database > Account Lists > Create New Account List
Create a dynamic list named something like:
Net-New High Intent Accounts – [Solution or Campaign]
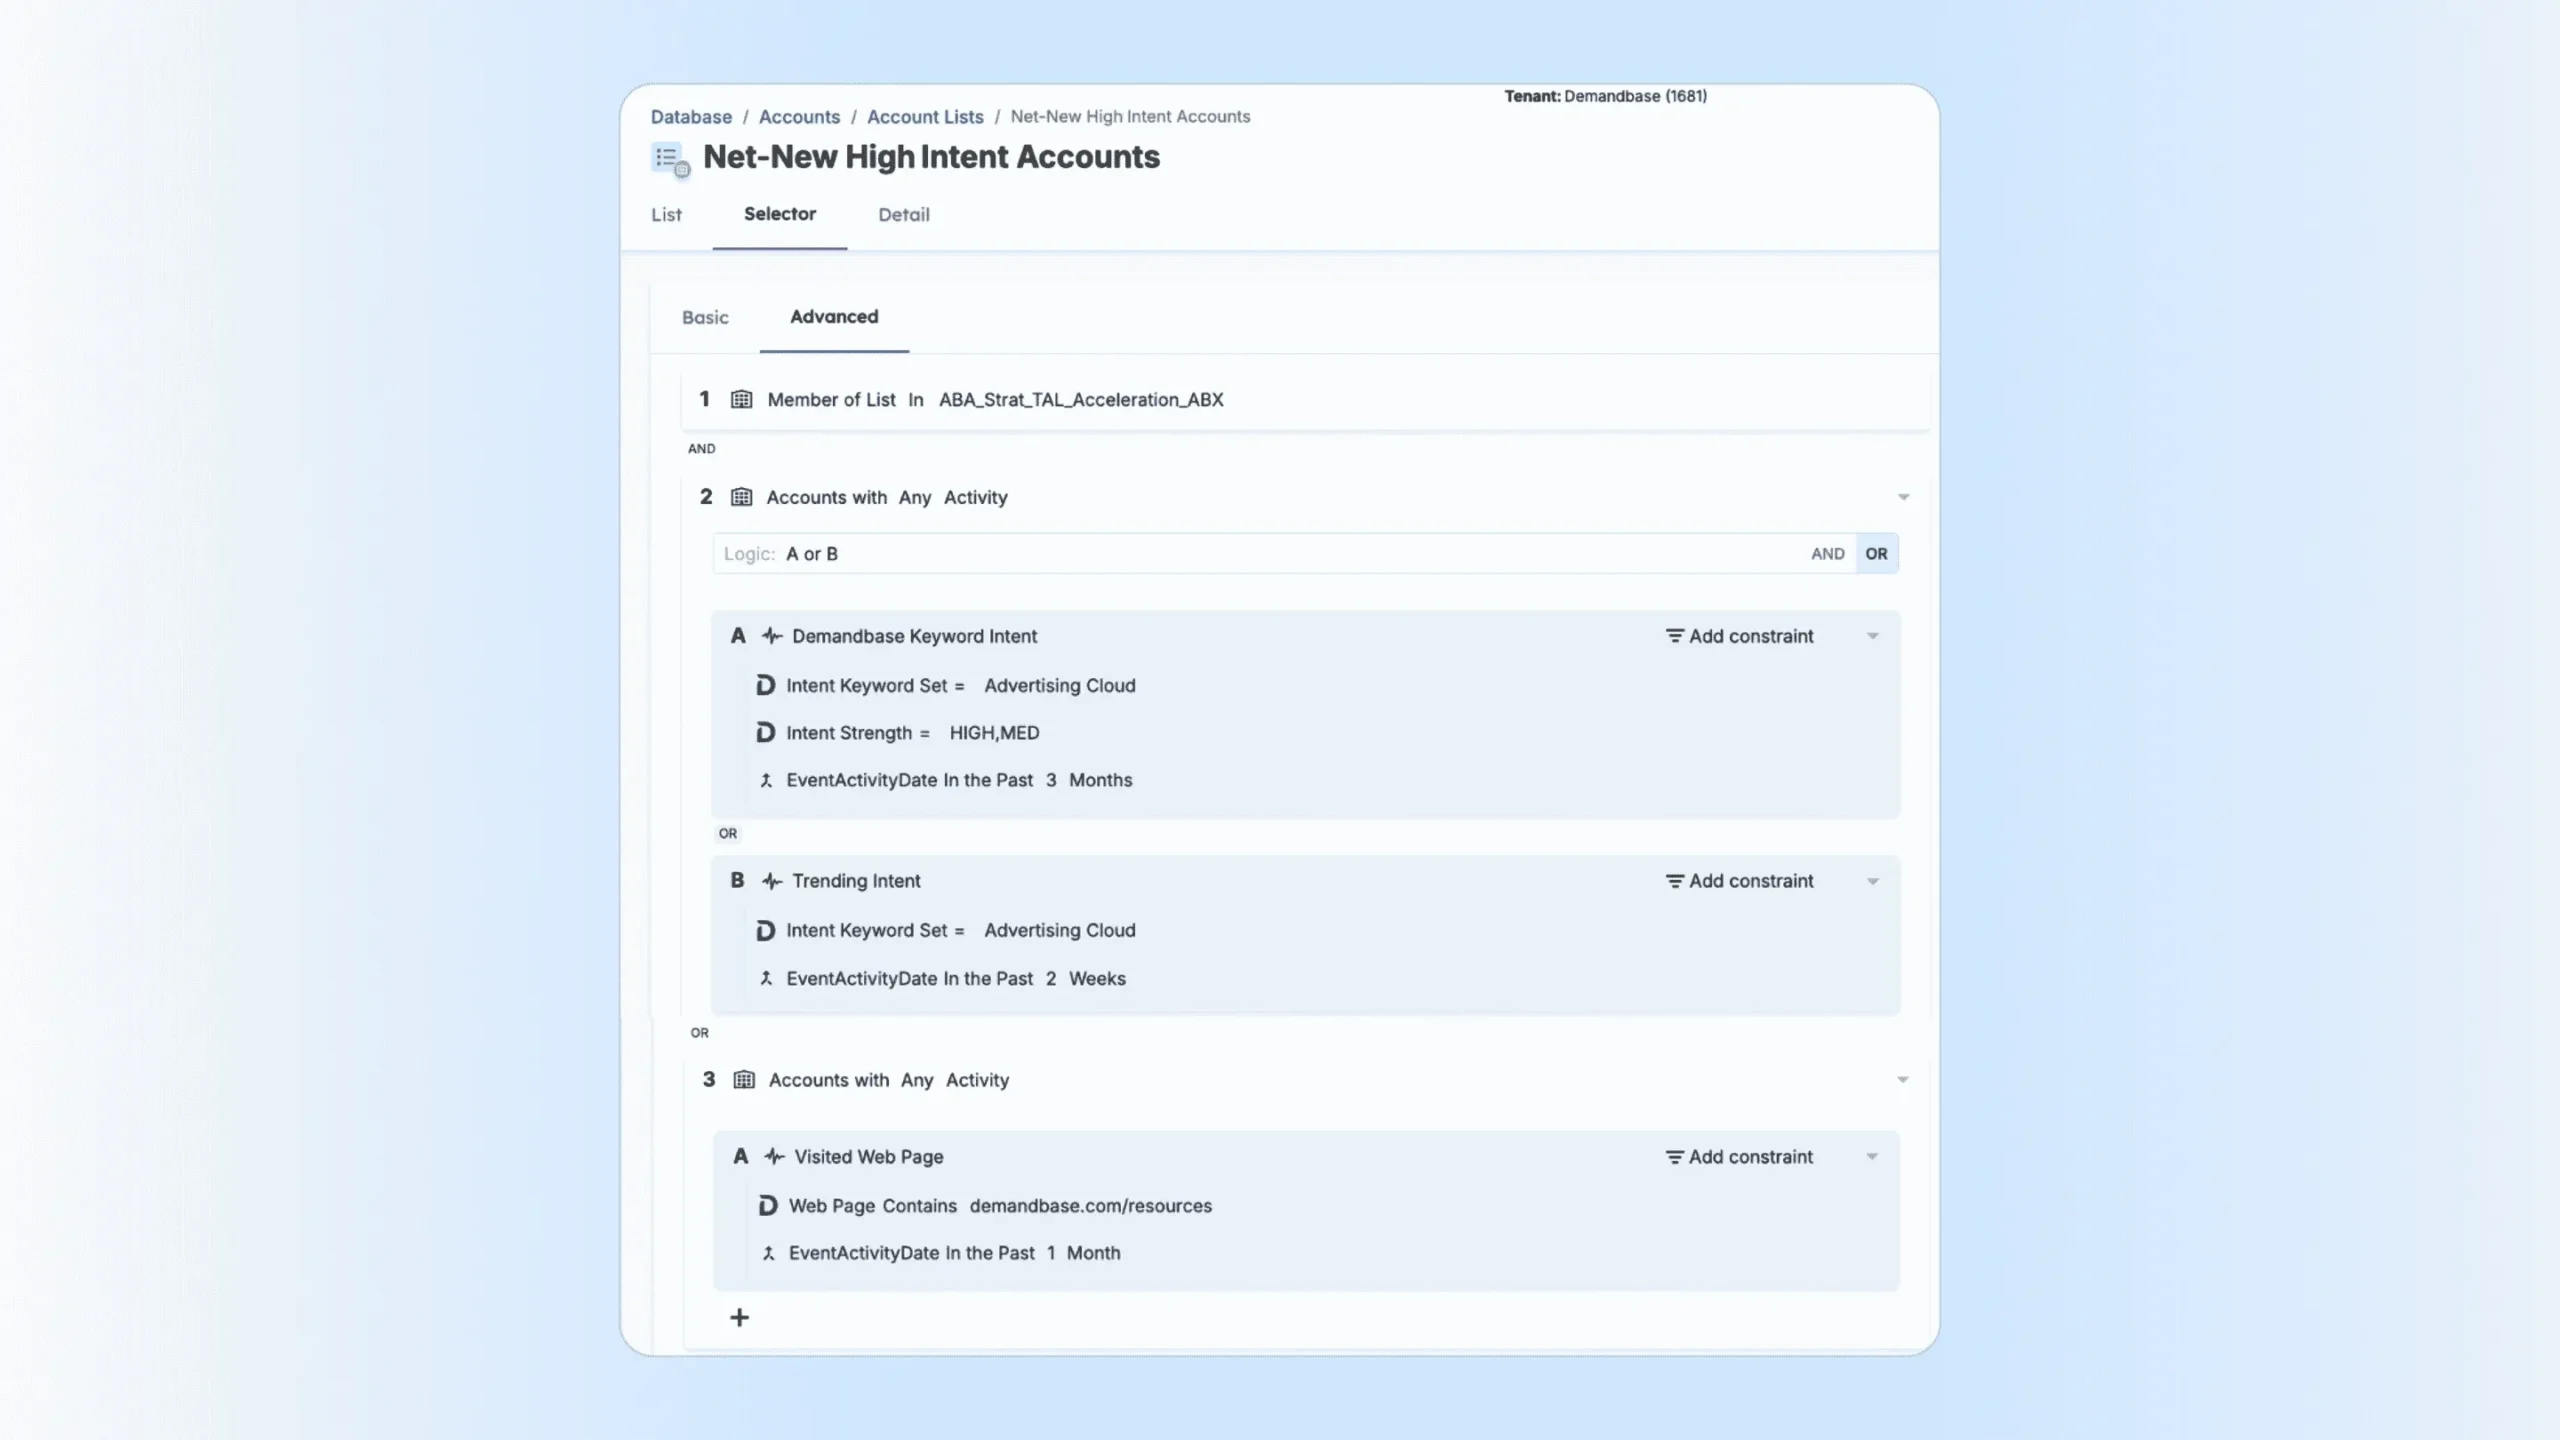
Build the selector using this structure:
NOT IN current campaign list
AND
(High or Medium Demandbase Keyword Intent OR Trending Intent)
AND
Recent on-site activity
This is the exact grouping: the exclusion is applied first, Keyword Intent and Trending Intent are grouped with OR logic, and recent website activity is then required with AND logic.
1. Exclude the current campaign audience
Add:
- Member of List
- Operator: Not In
- Value: the current campaign’s account list
This prevents accounts already being targeted from entering the new campaign.
2. Create the intent group
Add Accounts with Any Activity and set the internal logic to A or B.
A. Demandbase Keyword Intent
Configure:
- Intent Keyword Set: Use the same keyword set as the current campaign.
- Intent Strength: High and Medium.
- Event Activity Date: Use an appropriate recent period.
OR
B. Trending Intent
Configure:
- Intent Keyword Set: Use the same keyword set as the current campaign.
- Event Activity Date: Use a recent Trending Intent window.
3. Require recent website activity
Add another Accounts with Any Activity condition:
- Visited Web Page
- Web Page Contains: A page or site section relevant to the campaign.
- Event Activity Date: A recent website-engagement window.
Replace the example path with the high-value page most relevant to your campaign.
4. Validate the completed logic
The account must meet all three requirements:
- It is not in the current campaign list.
- It has either High or Medium Keyword Intent or Trending Intent for the current campaign keyword set.
- It has visited a relevant page on your website recently.
Refresh the list count, spot-check qualifying accounts, and save the list.
Step 2: Build and launch the high-intent campaign
Launch a Demandbase campaign using the new Net-New High Intent Accounts list.
Follow the standard Campaign Builder workflow with these inputs:
- Target account list: Net-New High Intent Accounts.
- Intent keyword set: The same keyword set used to qualify the audience.
- Flight dates: The period during which you want to capture the active demand.
- Creative: Messaging aligned with the topics represented by the keyword set.
- Budget:Enough to deliver 1,500–2,500 average impressions per account per month.
Before publishing:
- Allow the dynamic list to populate.
- Record the current account count.
- Calculate the required budget using the Part 1 formulas.
- Run Check Budget.
- Review estimated reach, projected spend, estimated impressions, and Maximum Possible Spend.
- Review and publish the campaign.
Option B: Expand an existing campaign
Use this approach when the current campaign is the right destination for the new high-intent accounts and you do not need a separate campaign or reporting structure.
Step 1: Open the current campaign account list
Navigate to:
Account Database > Account Lists > Select your current campaign account list
Update the existing campaign list rather than creating a separate list for the campaign to use.
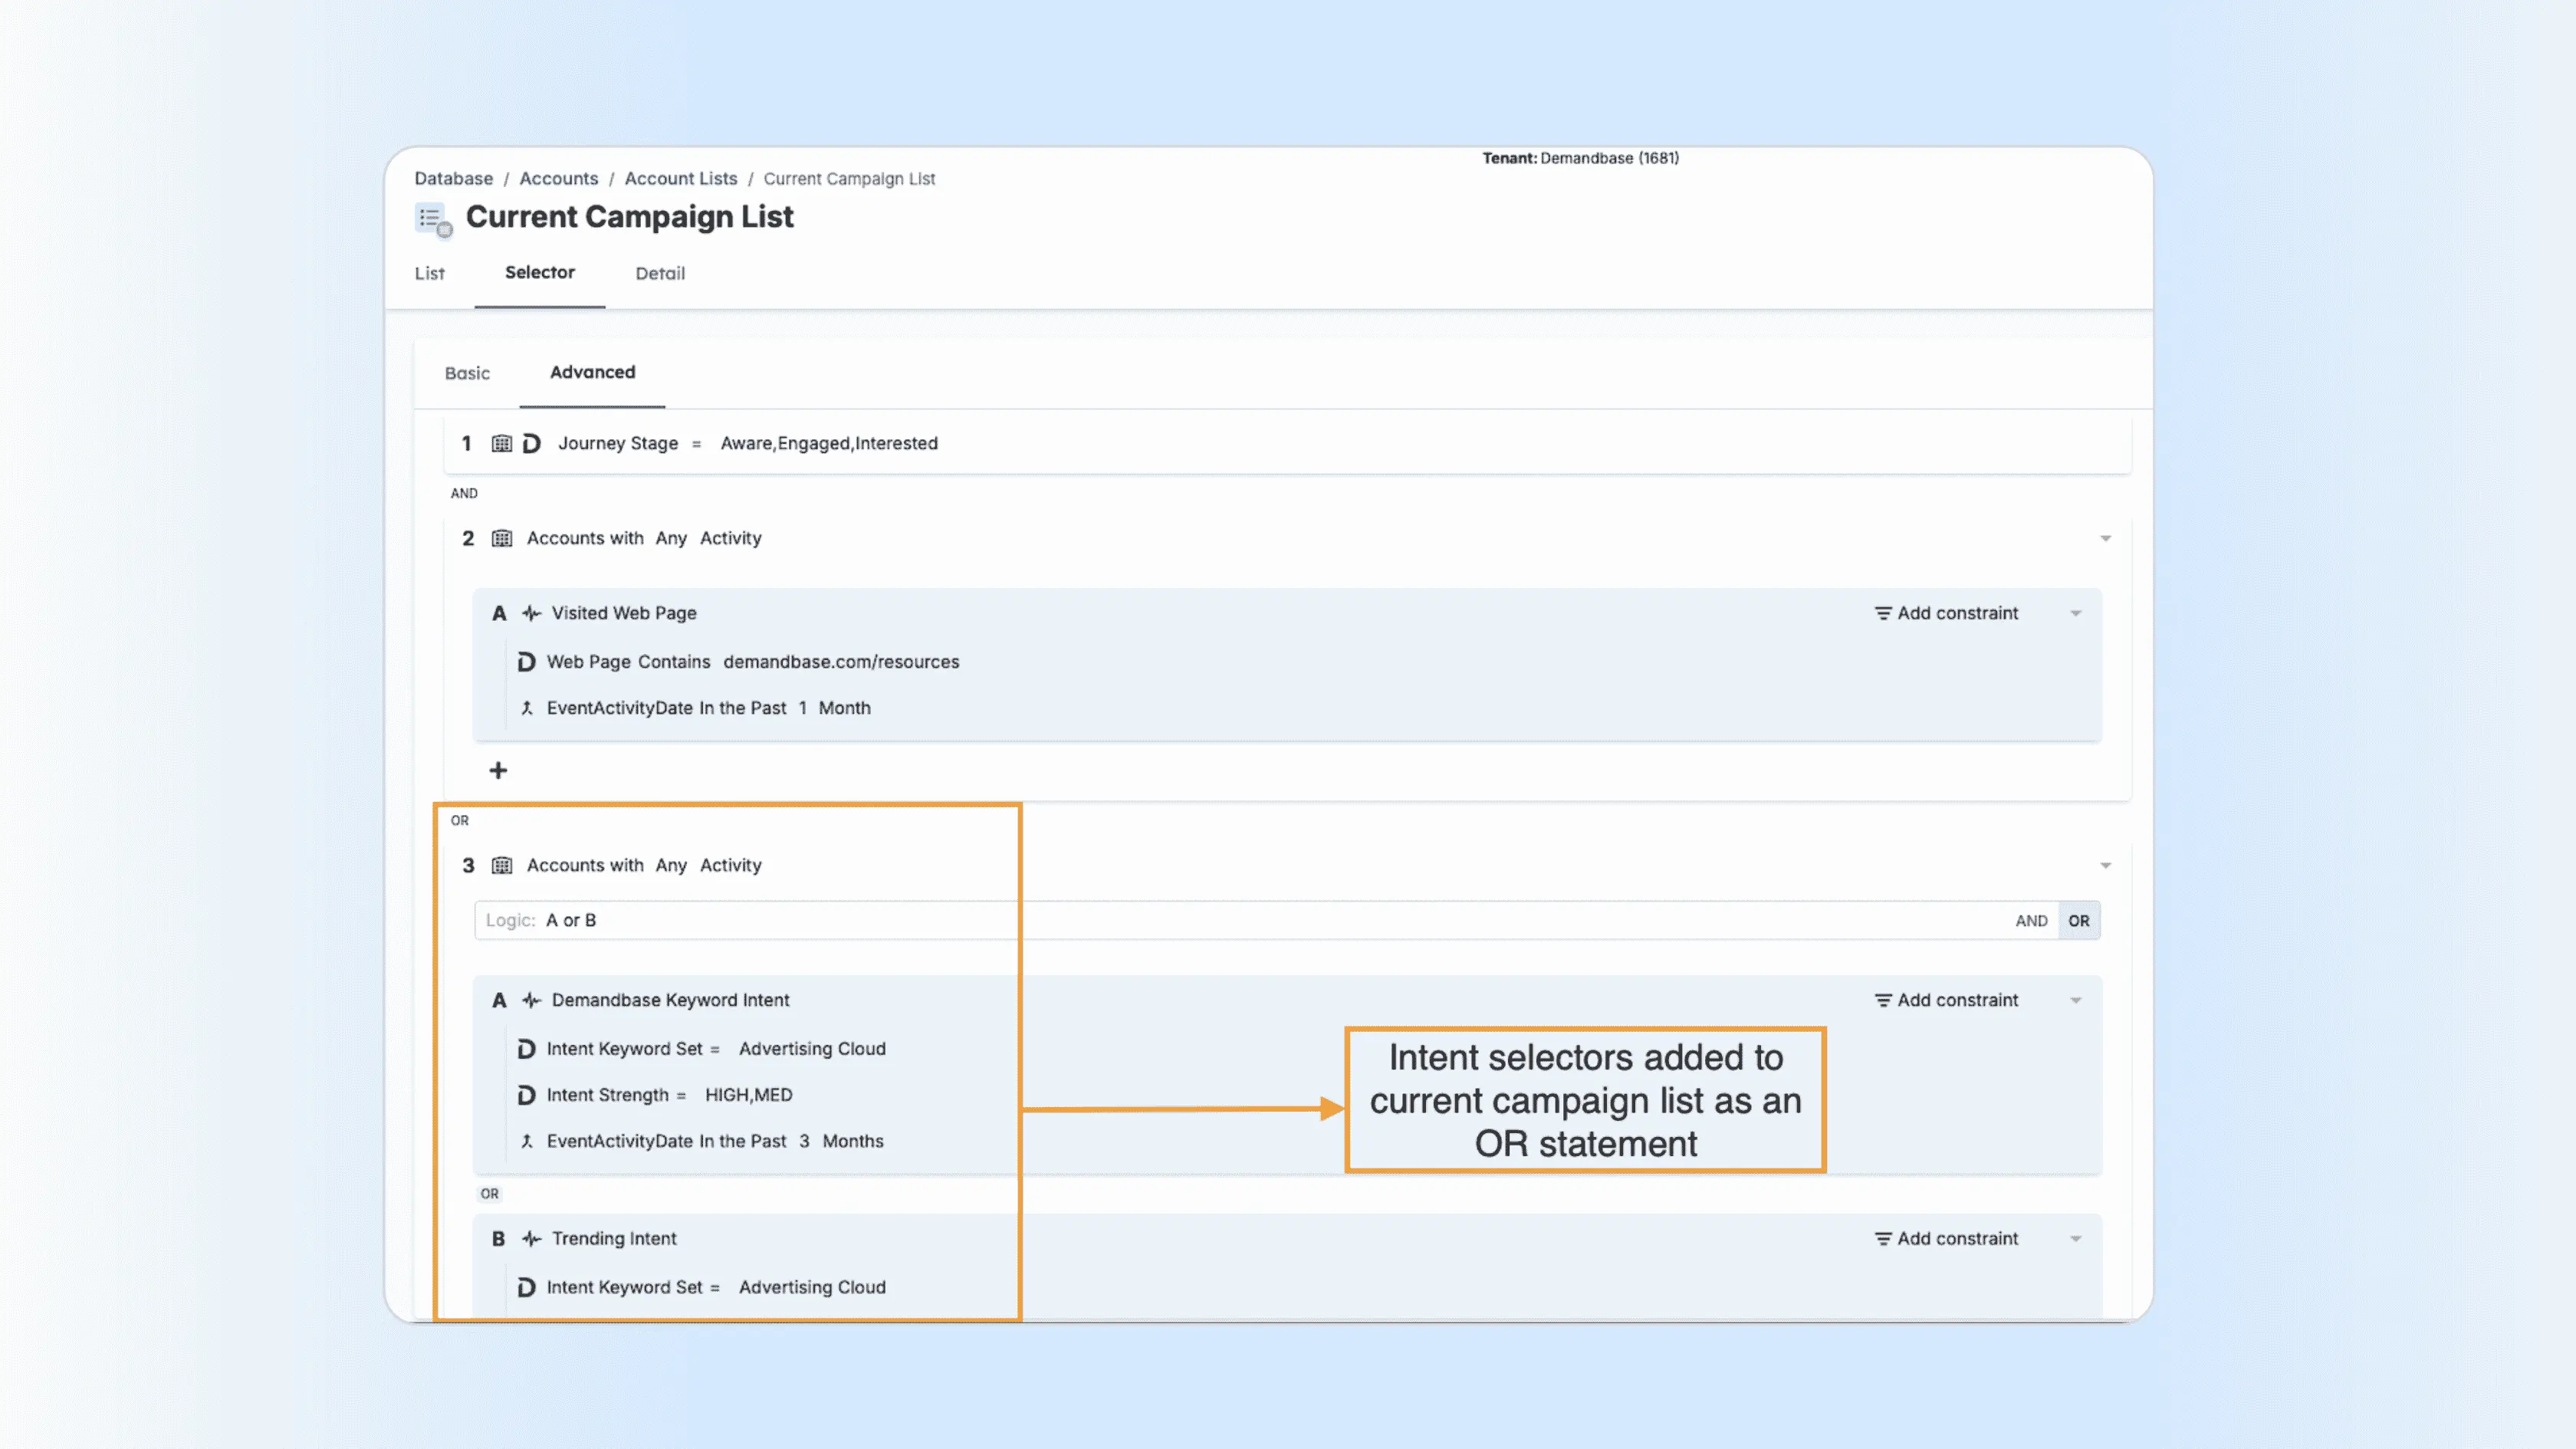
Step 2: Add a top-level OR branch
Preserve the current campaign-list criteria.
Add a new top-level OR branch using this structure:
Existing campaign account-list criteria
OR
New high-intent criteria:
- High or Medium Demandbase Keyword Intent using the current campaign keyword set
OR - Trending Intent using the current campaign keyword set
AND
- Recent on-site activity
The OR branch keeps every account already qualifying for the campaign while adding accounts that meet the new intent-and-engagement criteria.
Step 3: Validate the expanded audience
- Refresh the account count.
- Compare the new count with the previous count.
- Spot-check accounts entering through the new OR branch.
- Save the list.
- Allow the dynamic list to update.
- Record the expanded account count for budgeting.
Step 4: Recalculate the budget and republish
- Recalculate projected average impressions per account per month.
- Review Maximum Available Spend in Inventory Planner.
- Calculate the additional budget required to reach 1,500–2,500 impressions per account per month.
- Add that amount to the current total campaign budget.
- Run Check Budget.
- Review and republish the campaign.
Pro Tip: Intent is most effective when paired with first-party engagement.
Success Check: Monitor engagement and buying journey progression, paying particular attention to accounts added through the new intent criteria.
Part 4: Extend High-Performing Campaigns
Extending a campaign follows the same general workflow as Part 1. The primary difference is that you must define the new end date before recalculating available inventory and the budget required to maintain your target monthly impression level.
When to use this strategy
Choose this option when a campaign is delivering strong results and you want to increase its budget and extend its flight.
Goal
Maintain momentum from a successful campaign over a longer period.
Step 1: Review Maximum Available Spend for the extended flight
Choose the proposed new campaign end date.
Navigate to:
Advertising > Inventory Planner
Configure the forecast using:
- Flight start: Today’s date.
- Flight end: The proposed new campaign end date.
- The campaign’s current account list.
- The current CPM tier and average CPM.
- The current geotargeting.
- The current ad type.
- The current ad sizes.
Click Calculate available inventory and review:
- Reach.
- Reachable account count.
- Available impressions.
- Maximum Available Spend.
Confirm that sufficient inventory exists to support both the longer flight and the additional investment.
If inventory is limited, do not extend the campaign solely because additional budget is available.
Step 2: Calculate the additional budget needed
Use the Part 1 formulas with the campaign’s current account count, remaining budget, and remaining campaign days through the new end date.
Calculate the amount required to maintain 1,500–2,500 average impressions per account per month through the new end date:
Target Projected Impressions = Target Impressions per Account per Month × Number of Target Accounts × Remaining Campaign Months
Required Remaining Budget = (Target Projected Impressions ÷ 1,000) × Average CPM
Additional Budget Needed = Required Remaining Budget − Current Remaining Budget
Confirm that the Required Remaining Budget remains below Maximum Available Spend.
Also confirm that:
- The current account count is accurate.
- The CPM reflects current campaign delivery.
- Performance remains strong enough to justify the extension.
- The selected ad plan has enough unallocated budget.
Step 3: Add the additional budget to the current total budget
Calculate the new total campaign budget:
New Total Campaign Budget = Current Total Campaign Budget + Additional Budget Needed
Then edit the campaign.
1. Update the campaign end date
Navigate to:
Advertising > Campaigns > Select your campaign > Edit Campaign
In Step 1: Campaign Basics, update the campaign end date.
2. Update the campaign budget
Go to Step 4: Media Planning.
Enter the new total campaign budget—not only the incremental amount.
Click Check Budget and verify:
- Estimated reach.
- Projected spend.
- Estimated impressions.
- Maximum Possible Spend.
- Available ad-plan balance.
3. Review and republish
Go to Step 5: Review and Publish.
Review the updated:
- Campaign end date.
- Total campaign budget.
- Audience.
- Targeting.
- Creative.
- Ad plan.
Resolve any warnings, then click Publish Campaign.
Return to the campaign Details page and confirm that the new end date and total budget appear in the campaign summary.
Pro Tip: Extend campaigns only when performance remains strong and inventory is available.
Success Check → Monitor pacing, average impressions per account per month, engagement, and overall campaign performance.
Which strategy should you choose?
| If your goal is to… | Consider… |
| Improve an existing campaign | Increase Budget for Underfunded Live Campaigns |
| Re-engage accounts already showing buying intent | Retarget Highly Engaged Accounts |
| Reach new in-market accounts | Reach new high-intent accounts |
| Sustain momentum from a successful campaign | Extend High-Performing Campaigns |
Key takeaways
Additional budget does not always require creating something new. The greatest impact often comes from investing where campaigns are already succeeding or where accounts are demonstrating the strongest buying signals.
Before allocating additional budget, evaluate:
- Current campaign performance.
- Available inventory.
- Account engagement.
- Demandbase Intent signals.
- Your overall campaign objectives.
Aligning the investment with the right strategy helps maximize the value of every additional advertising dollar.
The results
Running this playbook helps you:
- Direct incremental budget toward campaigns and accounts with demonstrated potential.
- Increase campaign delivery without exceeding available inventory.
- Re-engage accounts already showing meaningful interest.
- Reach net-new accounts that combine relevant intent with first-party engagement.
- Sustain momentum from campaigns that continue to perform.
- Make budget decisions using a consistent, repeatable framework.
- Activate additional budget with clear calculations, defined checks, and measurable success criteria.
Partner with Demandbase Experts
Get tailored strategies and insights to optimize your approach, drive engagement, and unlock new opportunities.
More Playbooks
Complete playbook for setting up and optimizing Engagement Points in Demandbase marketing programs. Learn scoring methodologies, channel-specific assignments, and best practices for webinars, content, events, and forms.
How to sync Demandbase audiences to LinkedIn
Learn how to sync Demandbase audiences to LinkedIn to run targeted ABM campaigns, improve performance, and drive pipeline with intent-based targeting.
Engagement points for Demandbase intent
Learn how to assign Engagement Points to Demandbase Intent signals for accurate, actionable intent scoring that drives better targeting and ABM results.
We have updated our Privacy Notice. Please click here for details.